Warehouses allow cooperatives to define their storage locations and also manage stock in those warehouses. Managing warehouses is a feature for cooperatives only. Other user types accessing the mobile app should not be able to manage warehouses.
 |
|
| Warehouse Menu Screen | No Warehouse Screen |
| Warehousing can be accessed on the mobile app from the Profiling menu. Next you click on the Warehouses icon. The next screen you see after this depends on if there are warehouses already defined or not. If there are no warehouses defined you will see an empty screen with a button to create a new warehouse. | This screen is displayed when cooperatives access warehouse for the first time or for as long as they have added no warehouses. To create a new warehouse, the user clicks on the blue New Warehouse button. |
 |
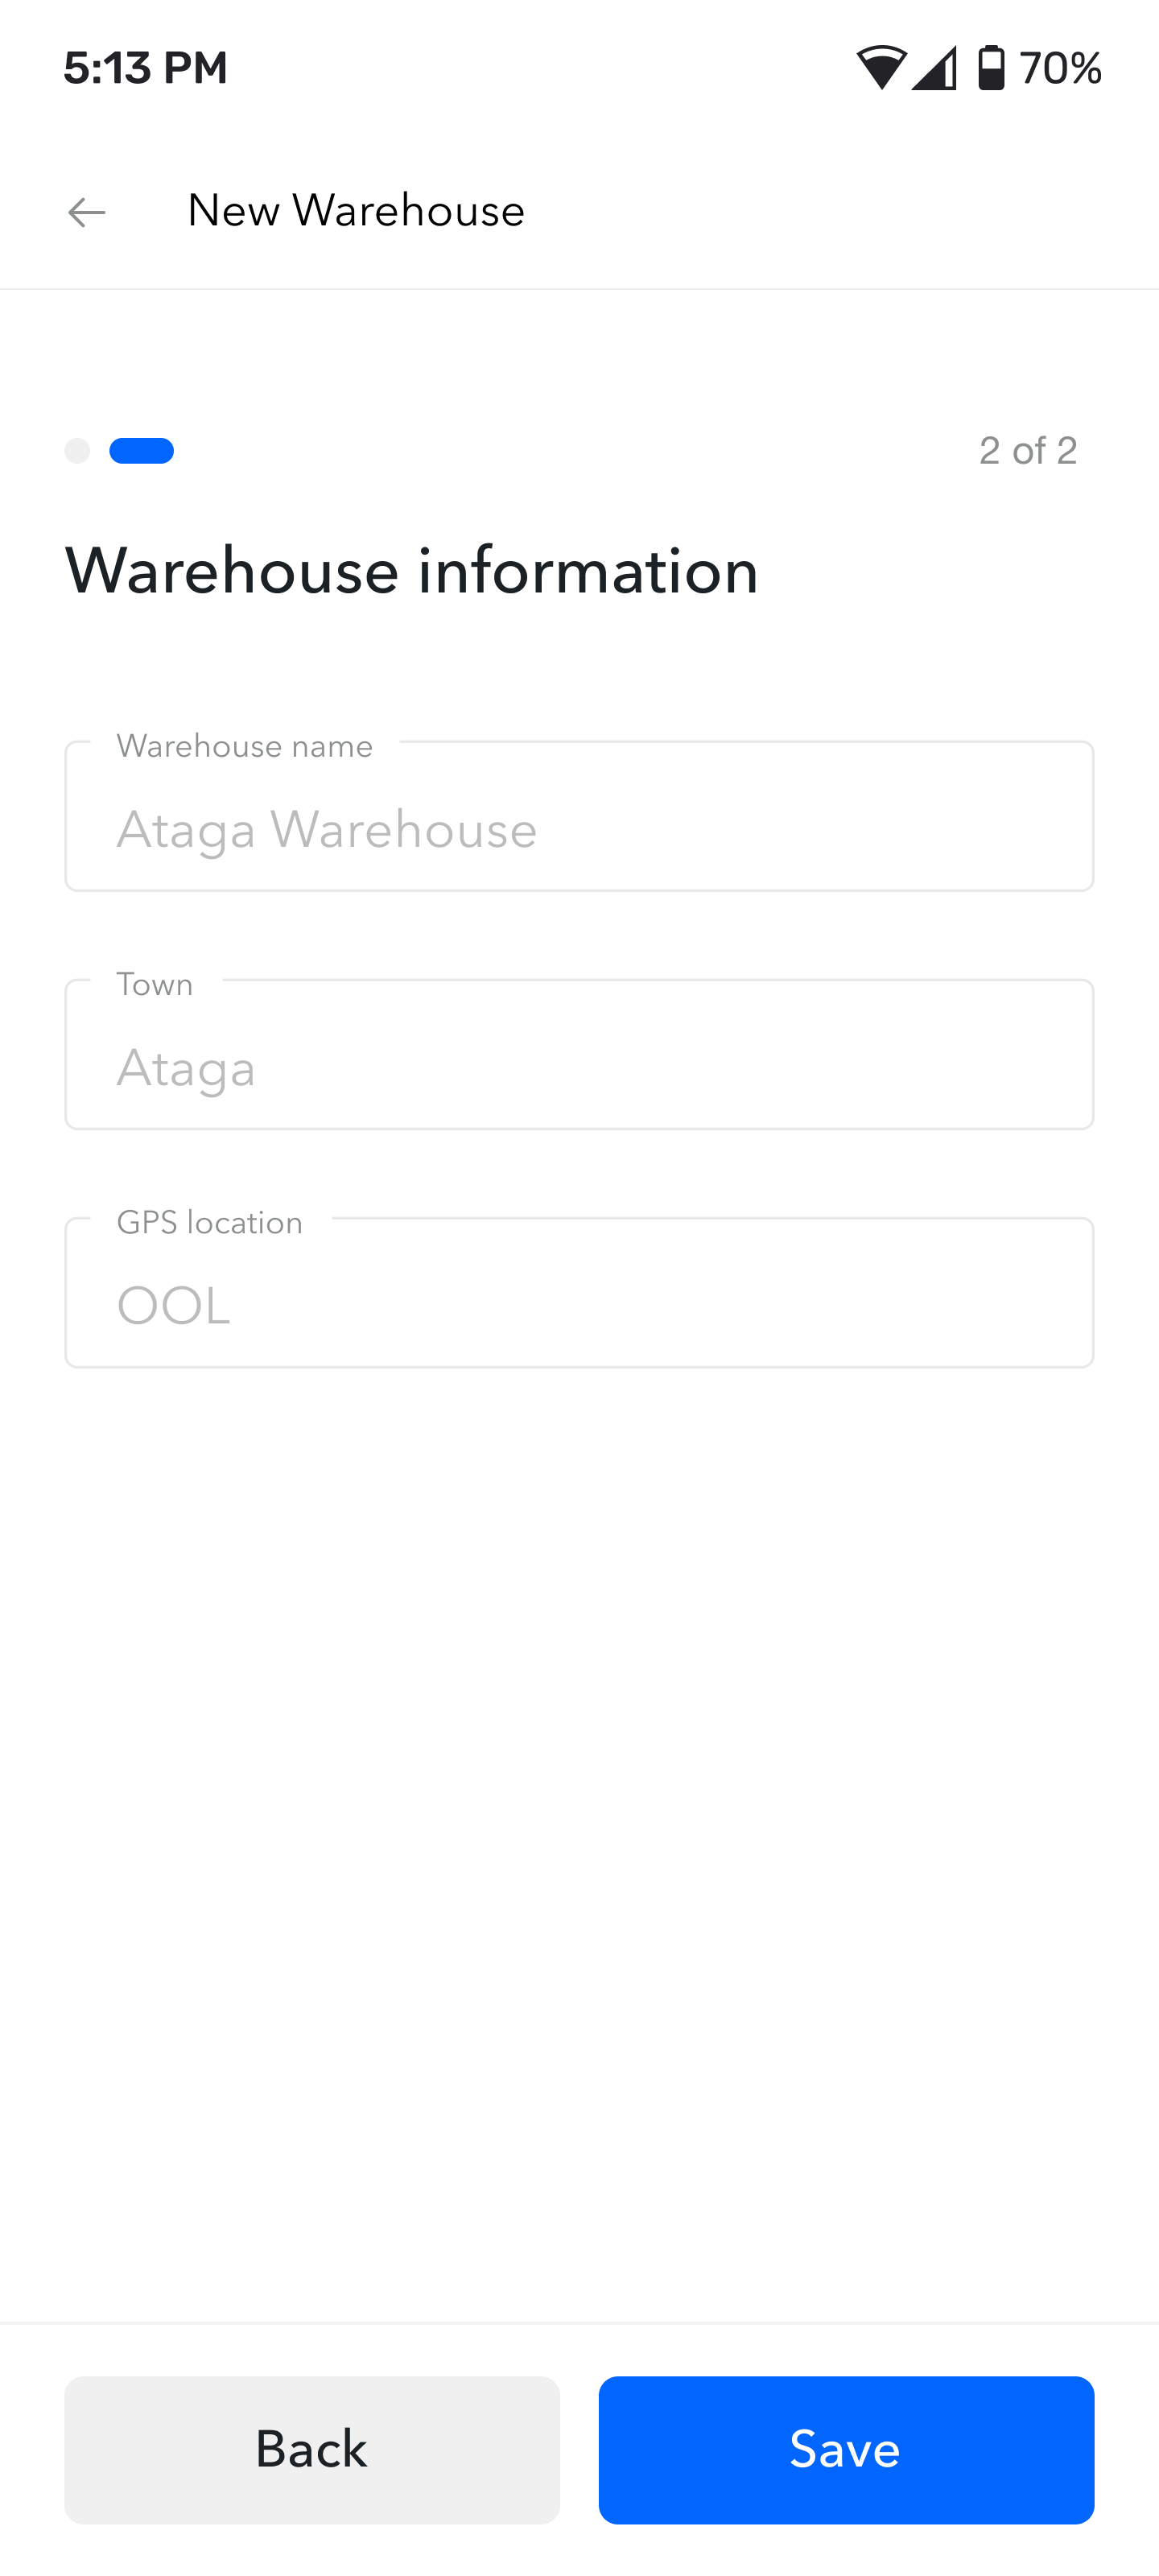 |
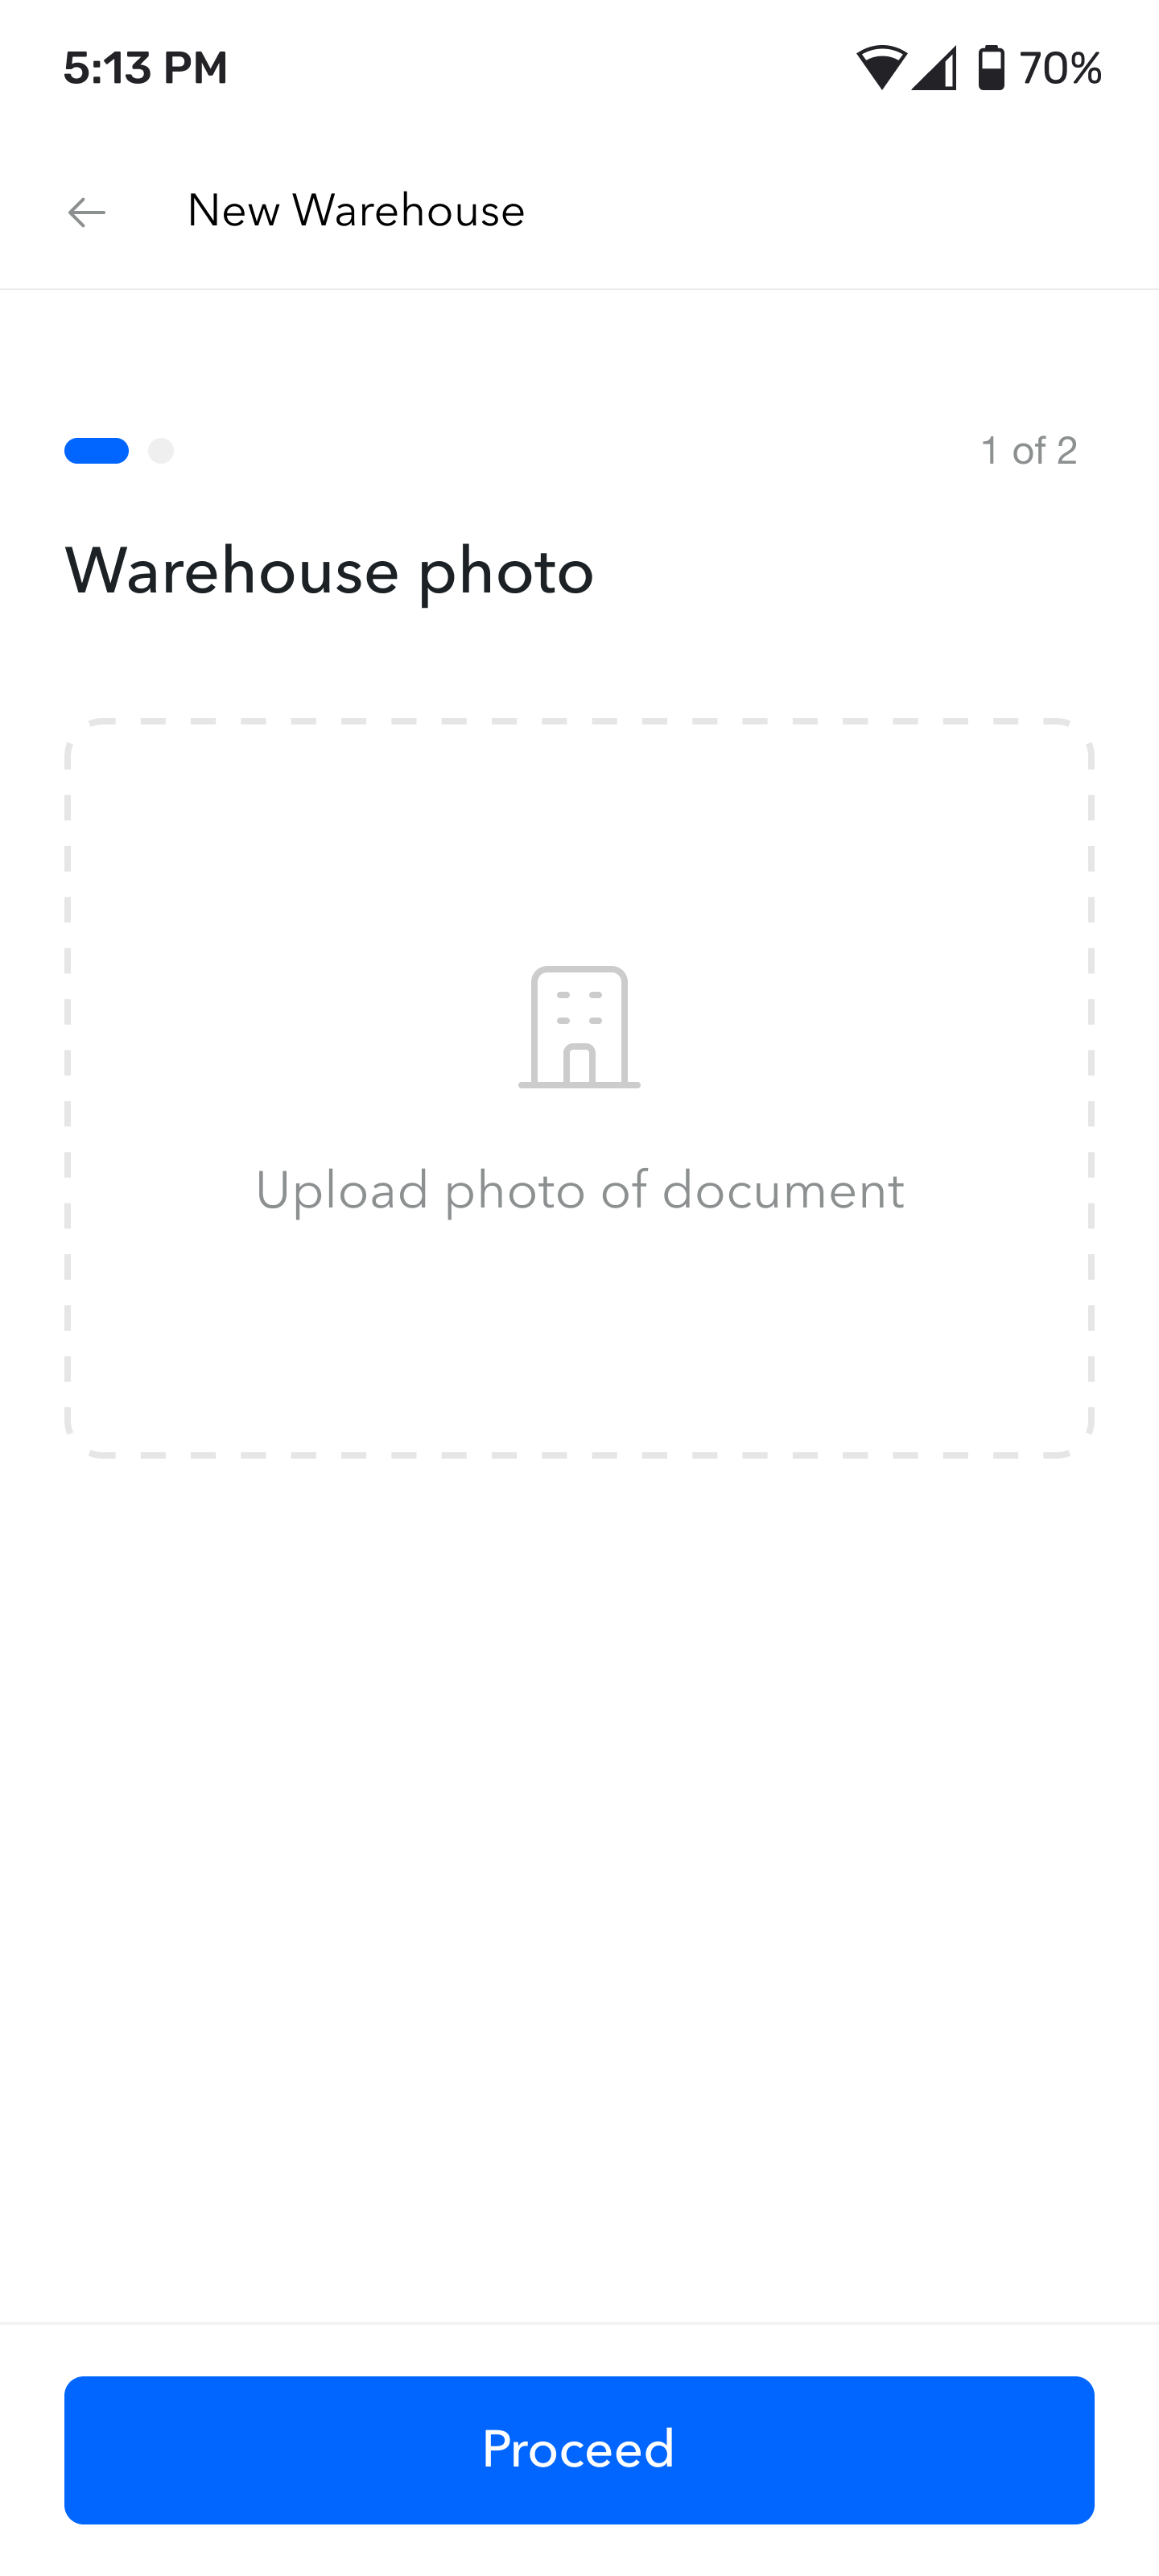
| Add Warehouse: Step 1: Photo Screen | Add Warehouse: Step 2: Details Screen |
| The first step in adding a new warehouse is to select a picture of the warehouse. This is an optional step. Users can skip this step to proceed to the next. Clicking on the Proceed button will send the user to the second step of the warehouse creation process. | After selecting a warehouse picture or skipping that step, the next is to enter the details of the warehouse. All the details on this screen are required. The user needs to enter the Warehouse name. This is a descriptive name by which the warehouse can easily be identified from the list of warehouses. Town is where the warehouse is located. GPS Location is the GhanaPost GPS coordinates of the warehouse. Clicking on the Back button sends the user back to the previous screen where they can select or change the warehouse picture. Clicking the blue Save button will save the warehouse. A cooperative cannot have the same warehouse name in the same location. |
 |
After successfully adding a warehouse, the user is taken to a screen displaying a list of all warehouses that have already been added with the option to add more warehouses by clicking on the blue New Warehouse button. Each warehouse record in the list displays the picture of the warehouse, the name of the warehouse and the location where the warehouse can be found. The GPS location of the warehouse is also displayed. Each record also has an Update and Delete button. Clicking on the Update button will allow the user to change the details of the warehouse. Clicking on the Delete button will allow the user to remove the warehouse completely. A warehouse can only be deleted if there are no stock or sales tied to that warehouse. |
| List of Warehouses Screen |
 |
 |
| Warehouse Details Screen | Record Stock Screen |
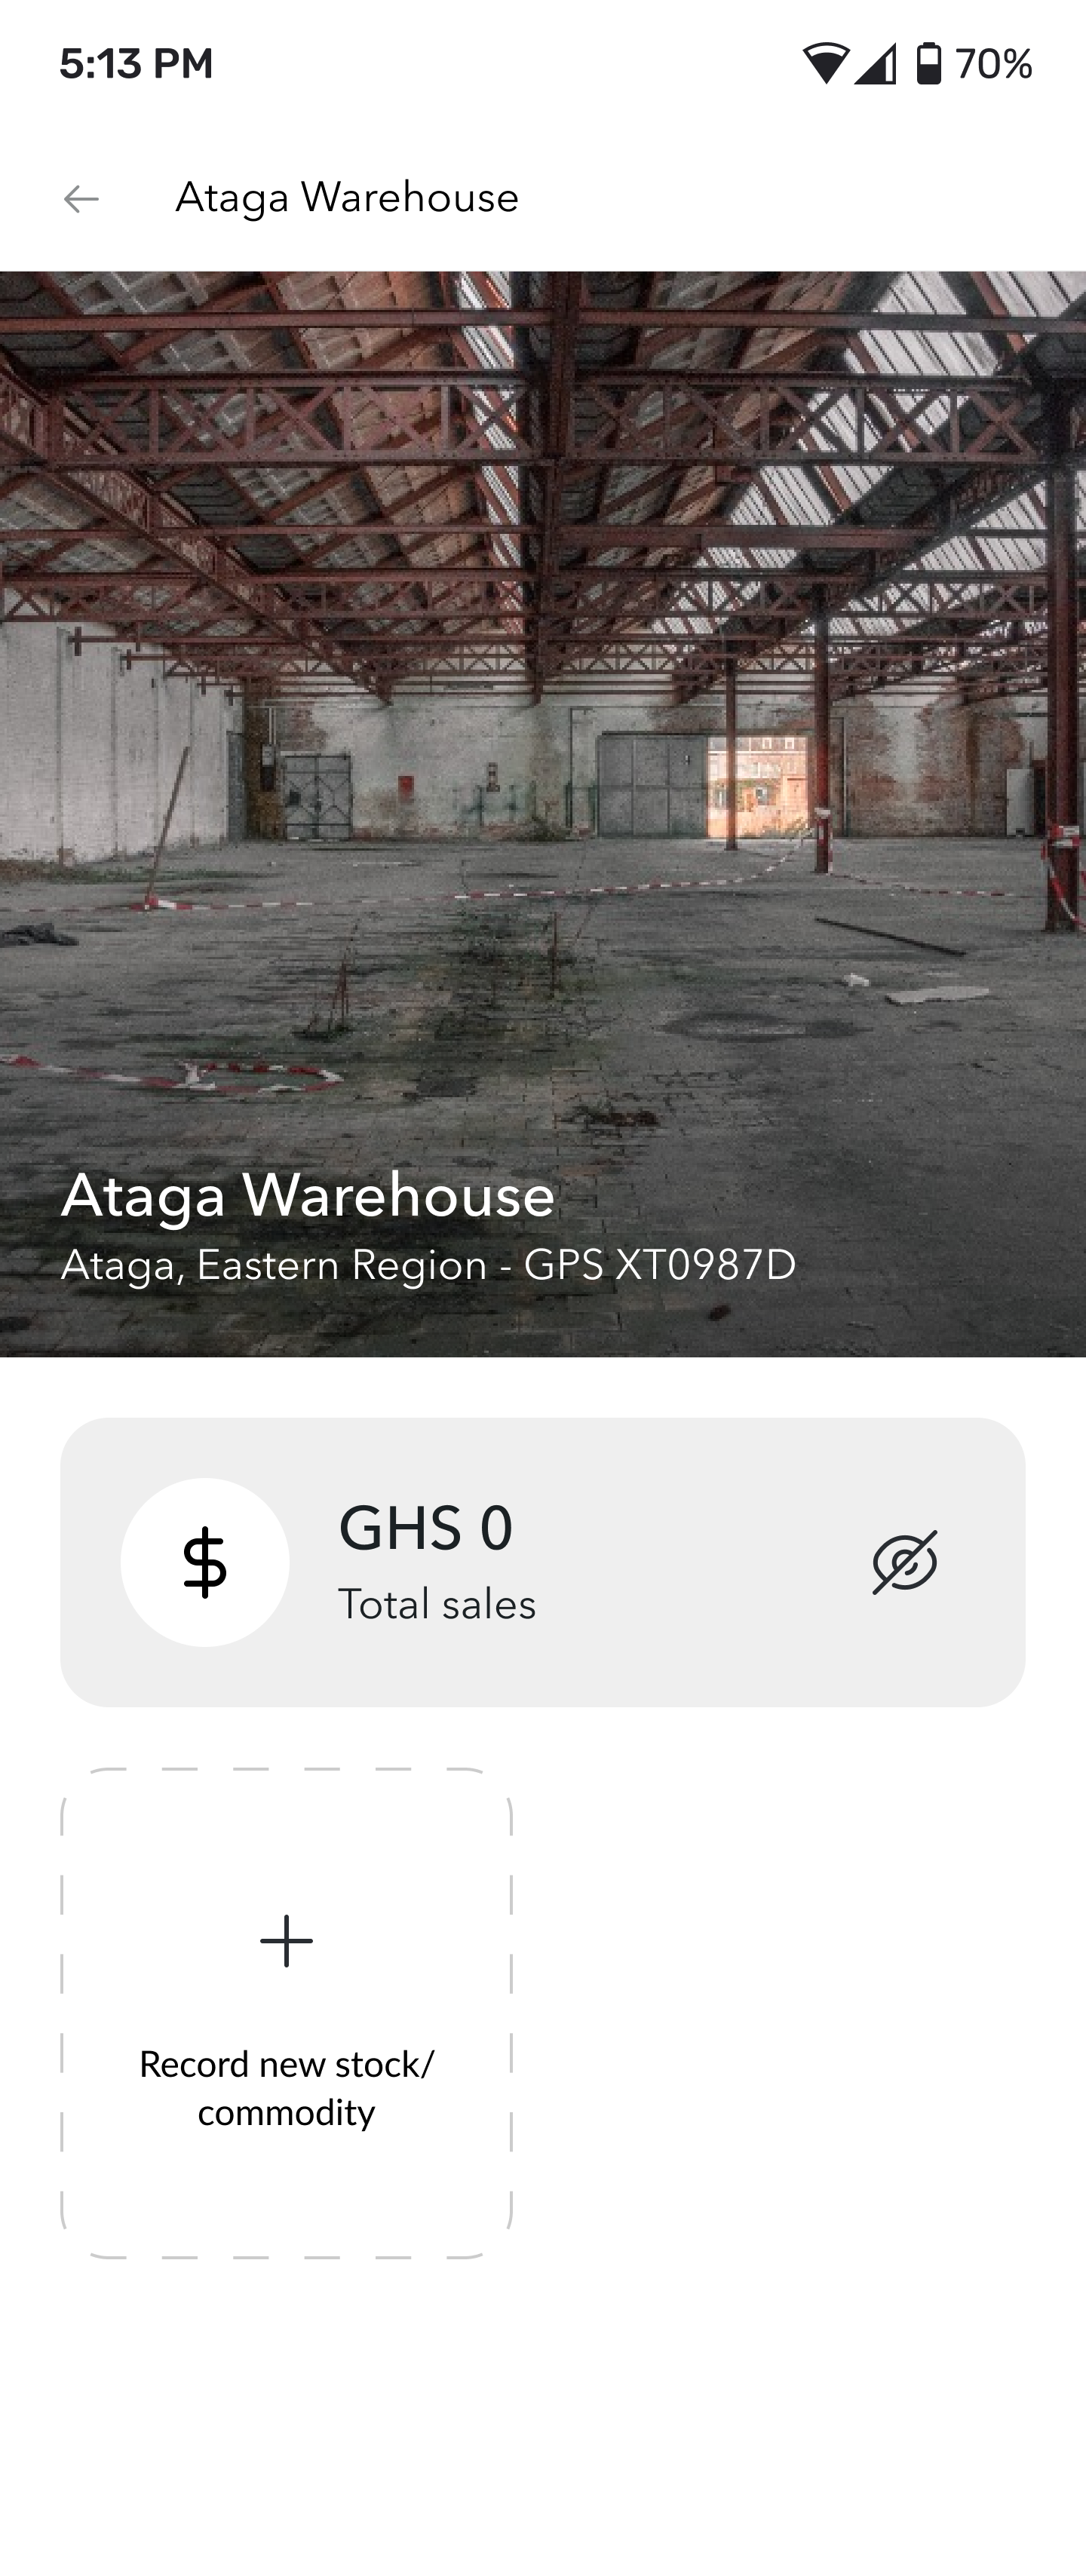
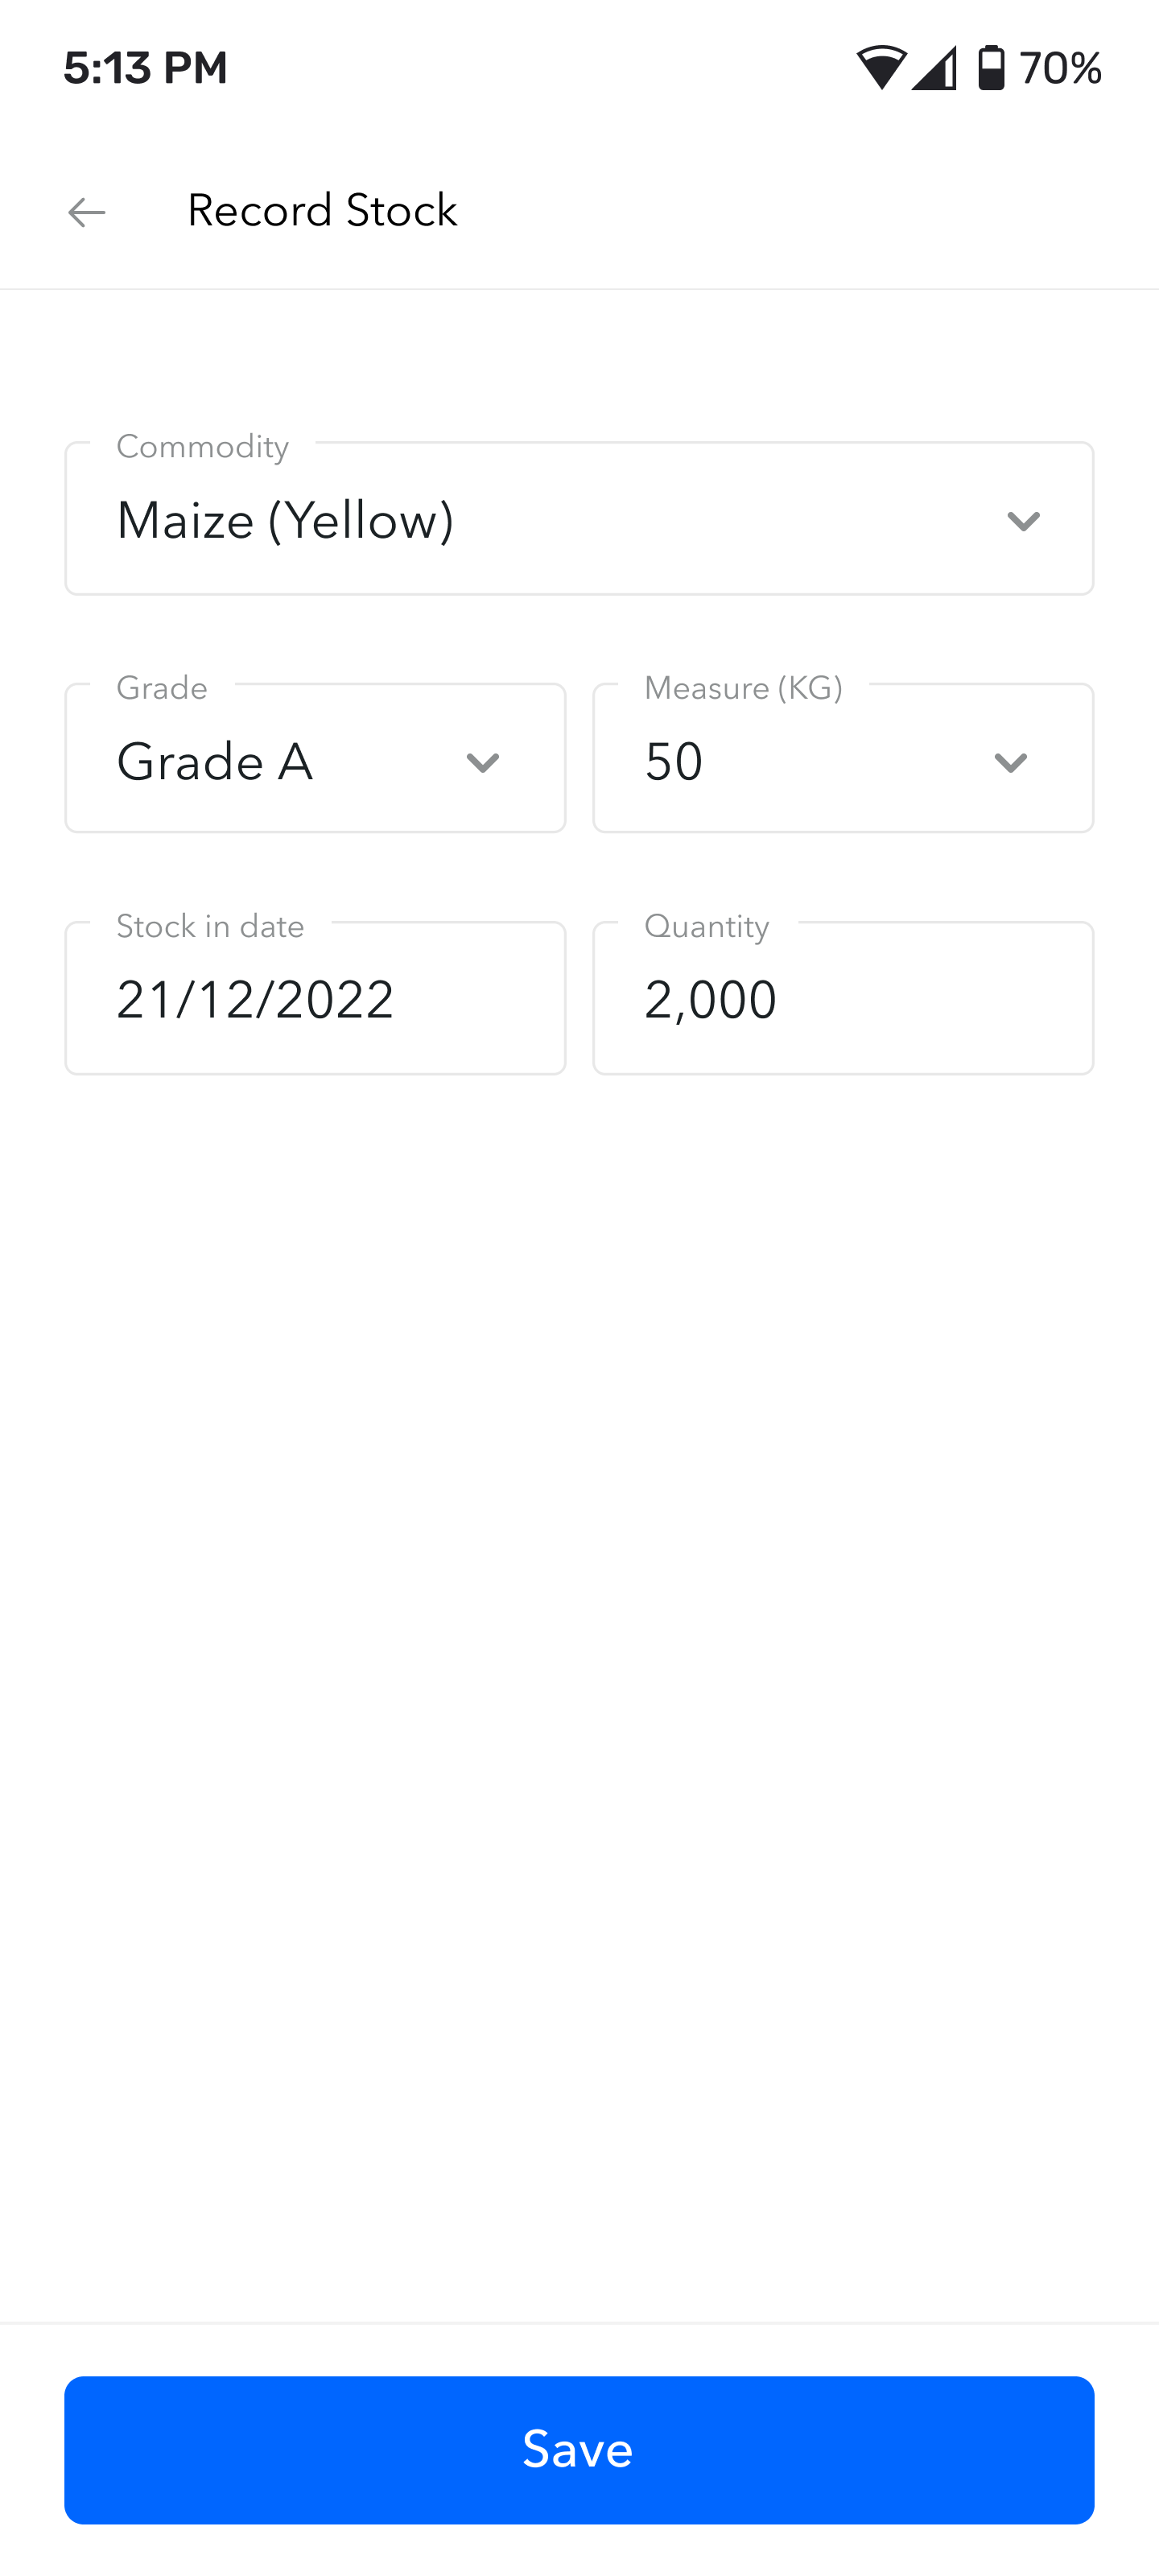
| Clicking on a warehouse record from the list of warehouses will open up the screen displaying details of the warehouse the user clicked on. The detailed warehouse screen carries over the details that were displayed from the listings screen but also shows the Total Sales that have been recorded for that warehouse. Because no stock have been recorded to this warehouse the user has the option to add initial stock to this warehouse. If stock already exist, the Warehouse Details: With Stock screen is displayed. From this screen the user can click on the Total Sales card to go the screen that lists all sales that have been recorded for this warehouse. The user can also click on the Record new stock/commodity box to record new stock. | Clicking on the Record new stock/commodity box brings the user to this screen where they can enter details of the stock. To record a stock, the user needs to select the Commodity being stocked. Next they can select the Grade of the commodity. Next the user will need to select the measure the commodity is being stocked in. The commodity, grades and measures lists are defined by the project coordinators and passed into the app when the user syncs their data. The user then selects the stock date. This should default to the day the stock is being recorded but the user should be able to pick any date in the past. The stock date cannot be in the future. Finally, the user enters the quantity of the commodity being stocked. The numeric keyboard should be displayed when the user is entering the quantity. Clicking the blue Save button will send the user back to the Warehouse Details Screen. |
 |
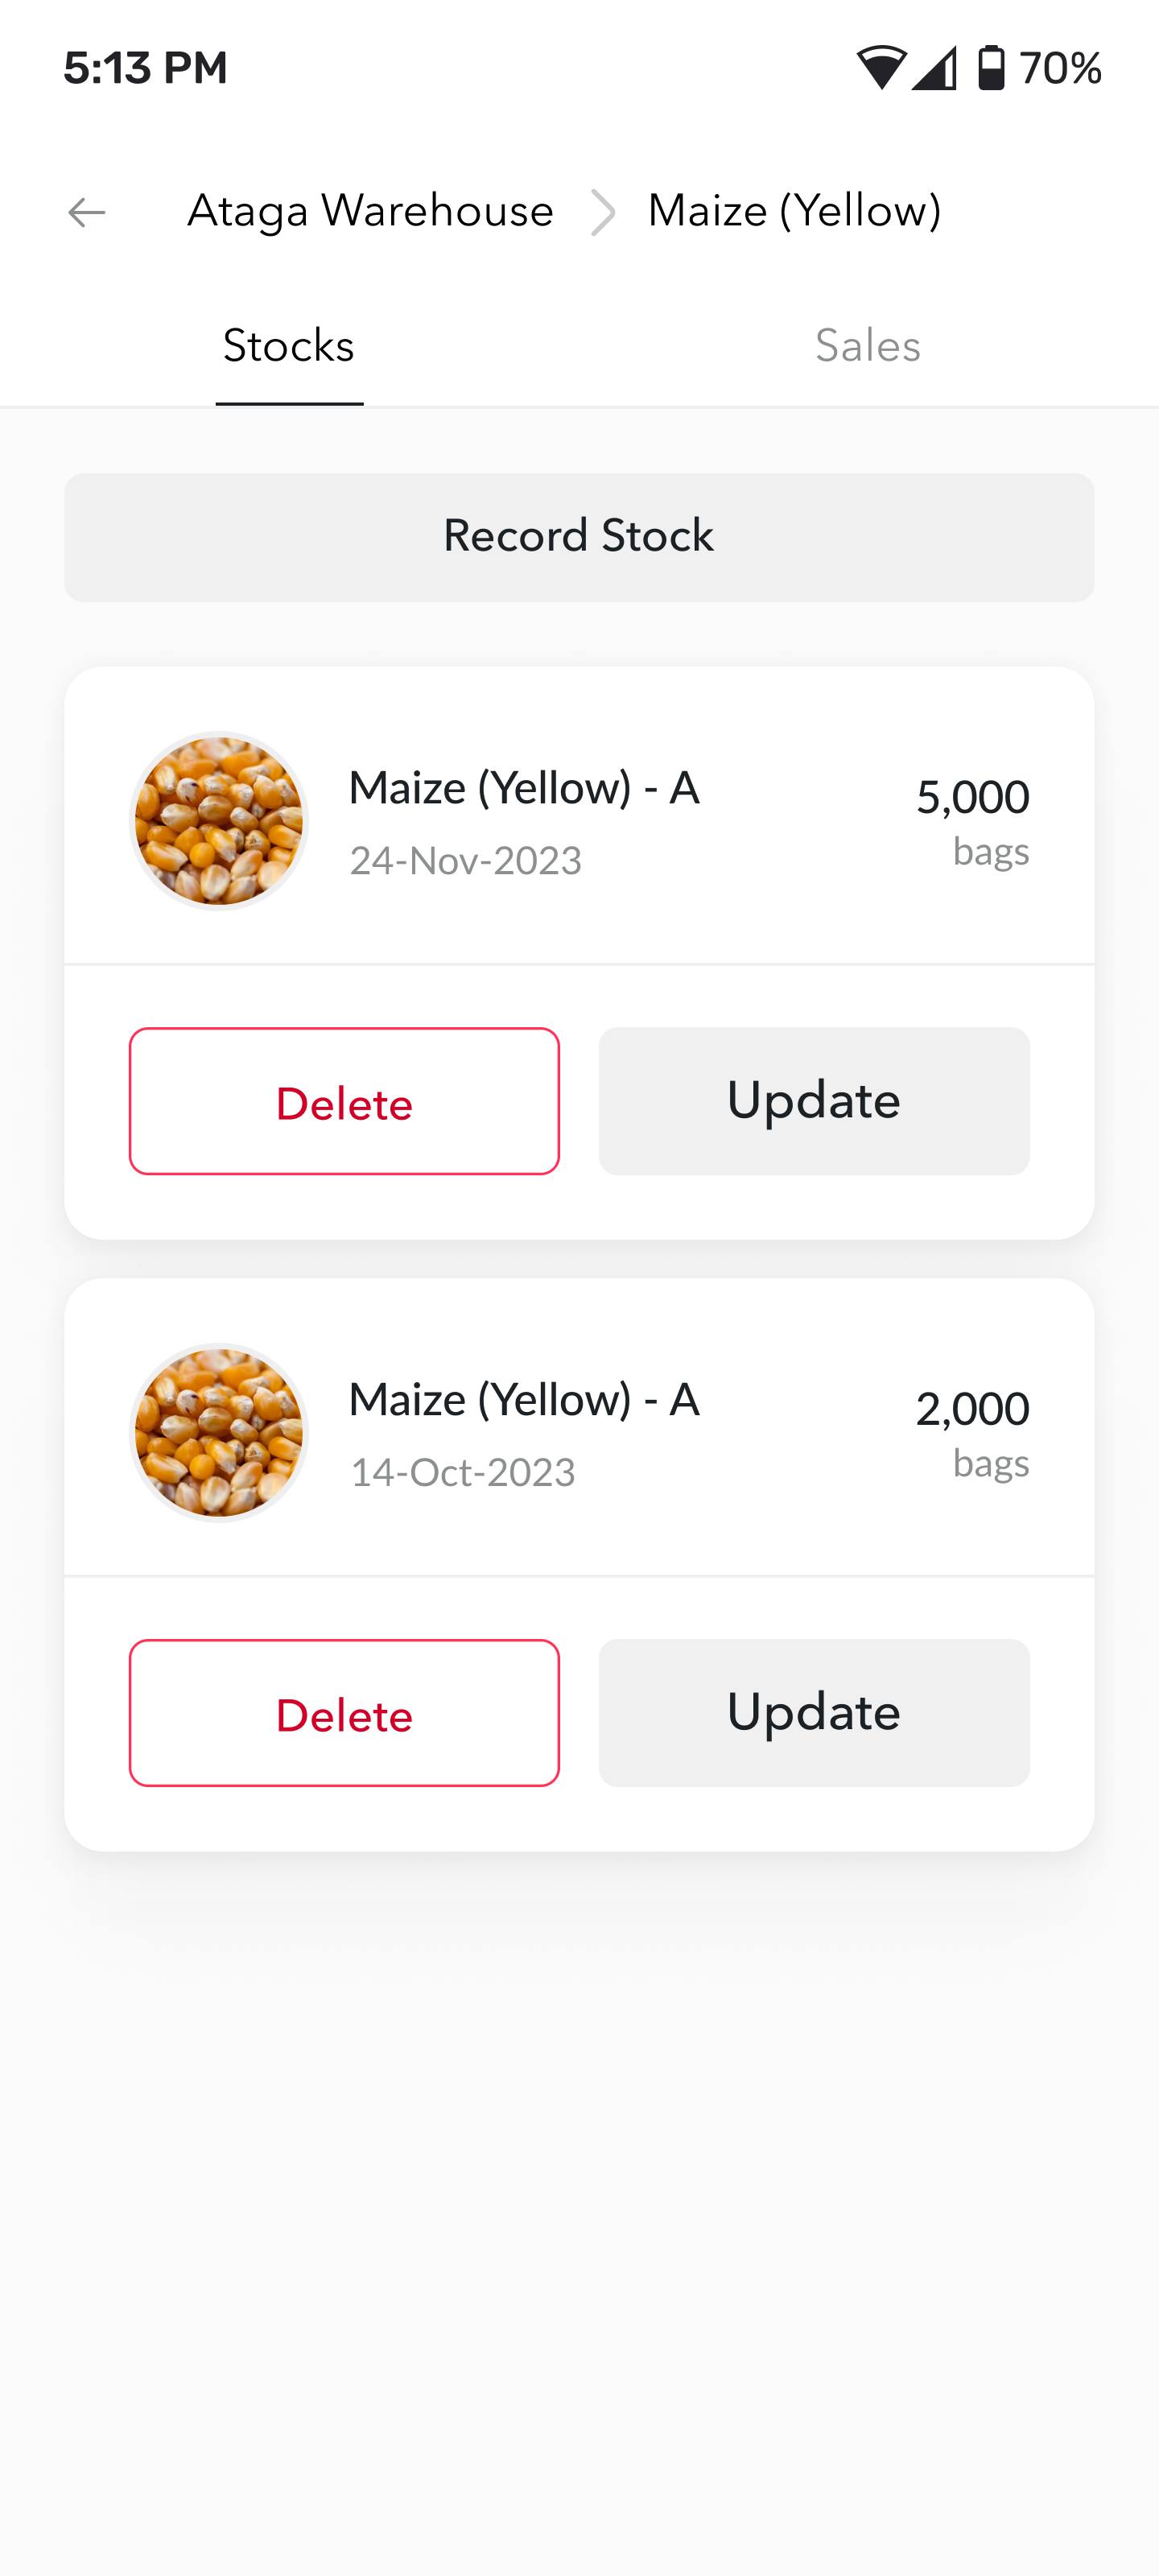 |
| Warehouse Details: With Stock Screen | Stock List Screen |
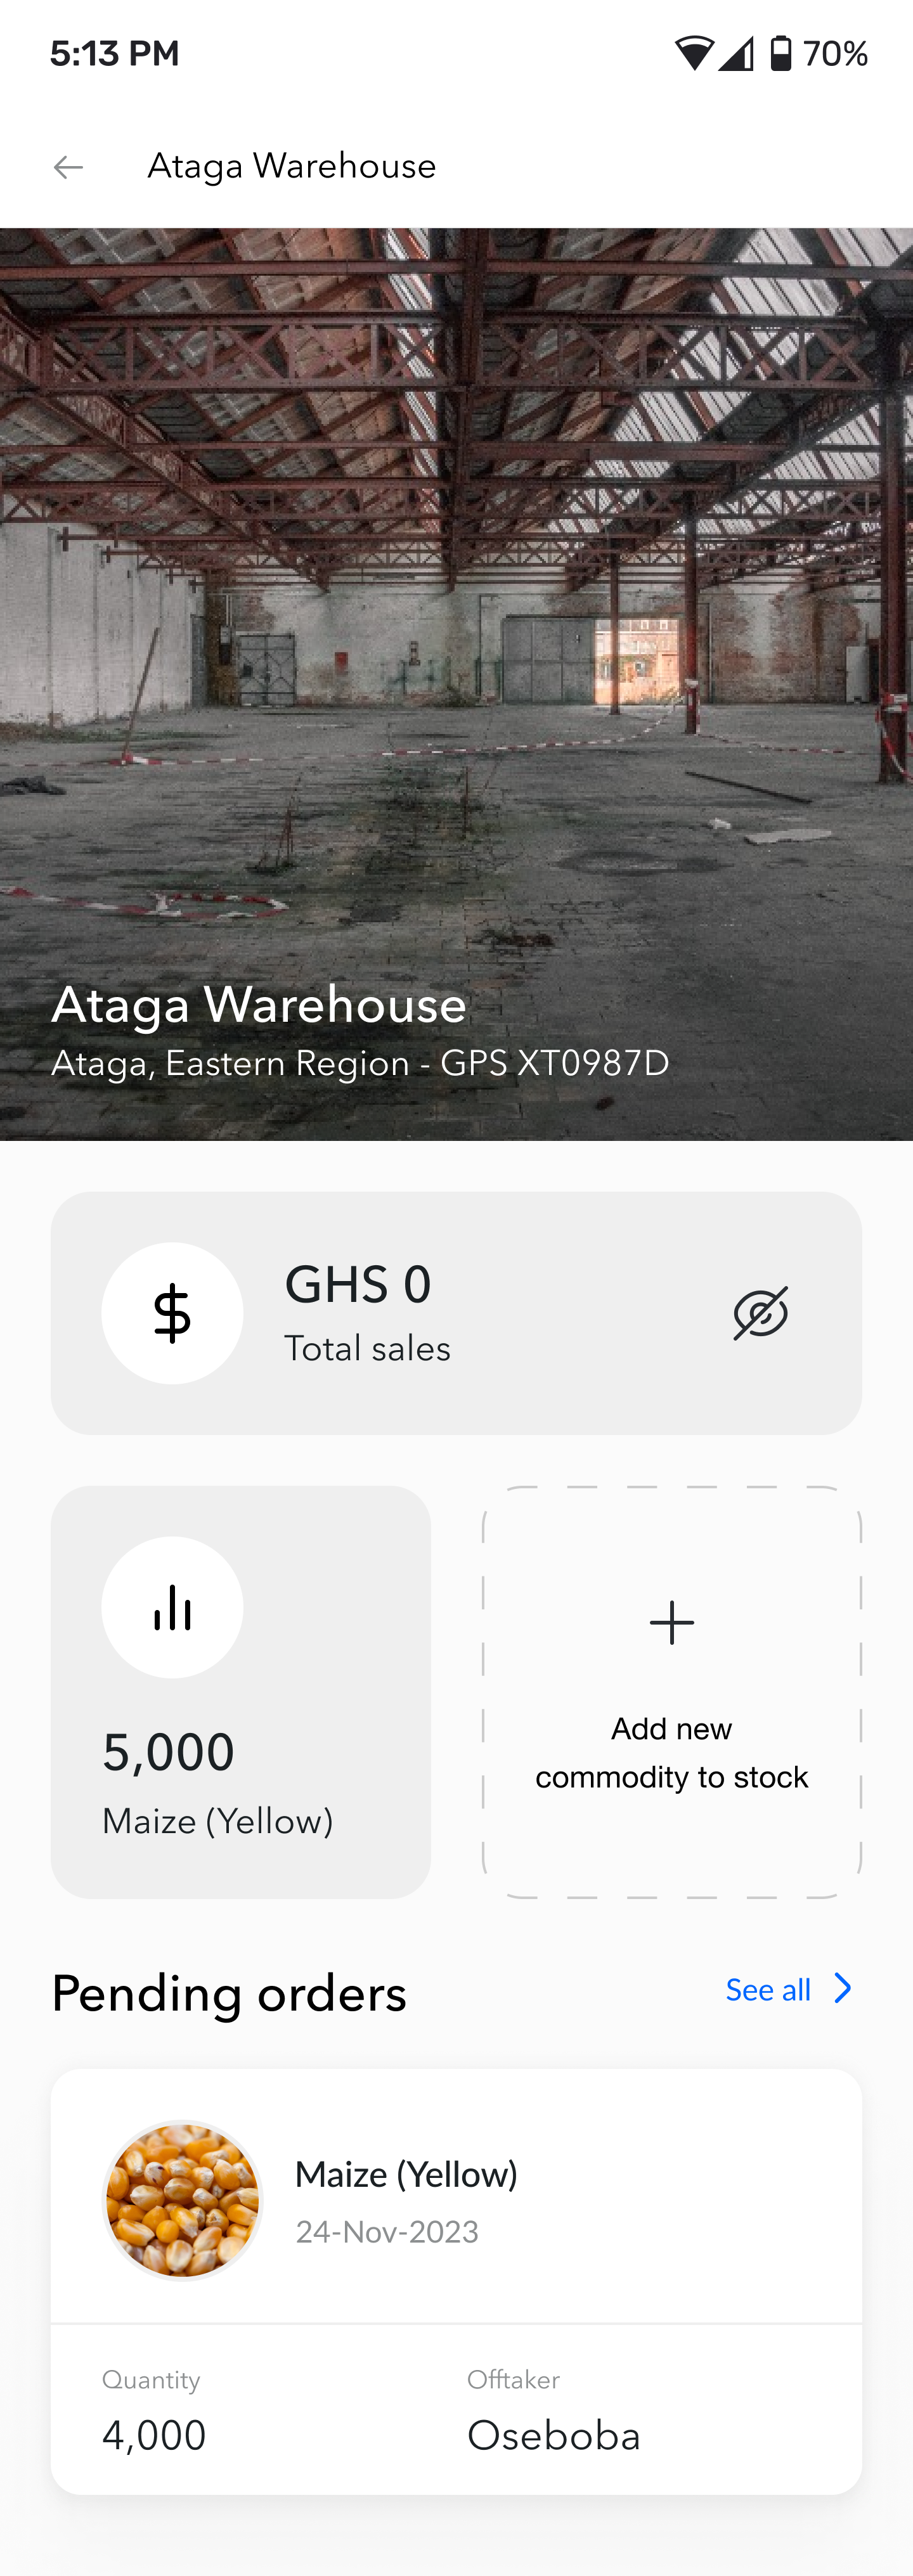
| This screen is very similar to the Warehouse Details Screen except for the box that says 5,000 Maize (Yellow). This screen is what is displayed when there are stock already defined in this warehouse. Every new commodity gets its own box. From the above screen, if new stock is added for Maize (Yellow), the quantity will increase from 5,000. You will notice a new No Orders section. This is visible once stock exist for a warehouse. This section will be replaced with orders once they are available. Clicking on a commodity or stock card will display the Stock List Screen. | This screen has two tabs, Stocks and Sales. The tab to be displayed by default depends on what the user clicked on prior to this screen. The user can switch between tabs though. In this case, we clicked on a stock from the warehouse so the Stocks tab is displayed with the list of commodities matching the commodity we clicked on. Each stock card displays the name of the commodity and its grade, quantity and date the stock was recorded. There are two buttons to either Delete or Update the stock. The user can click on the Record Stock from this screen to record a stock. In this specific case, the user will be restricted to record sales for this warehouse and for Maize (Yellow) or whatever commodity was clicked on from the Stock List Screen. |
Offers are quantities of commomdities cooperatives make available for sale. These are visible to buyers who can express interests to buy. An expression of interest to buy a cooperative's offer is treated as an Order.
 |
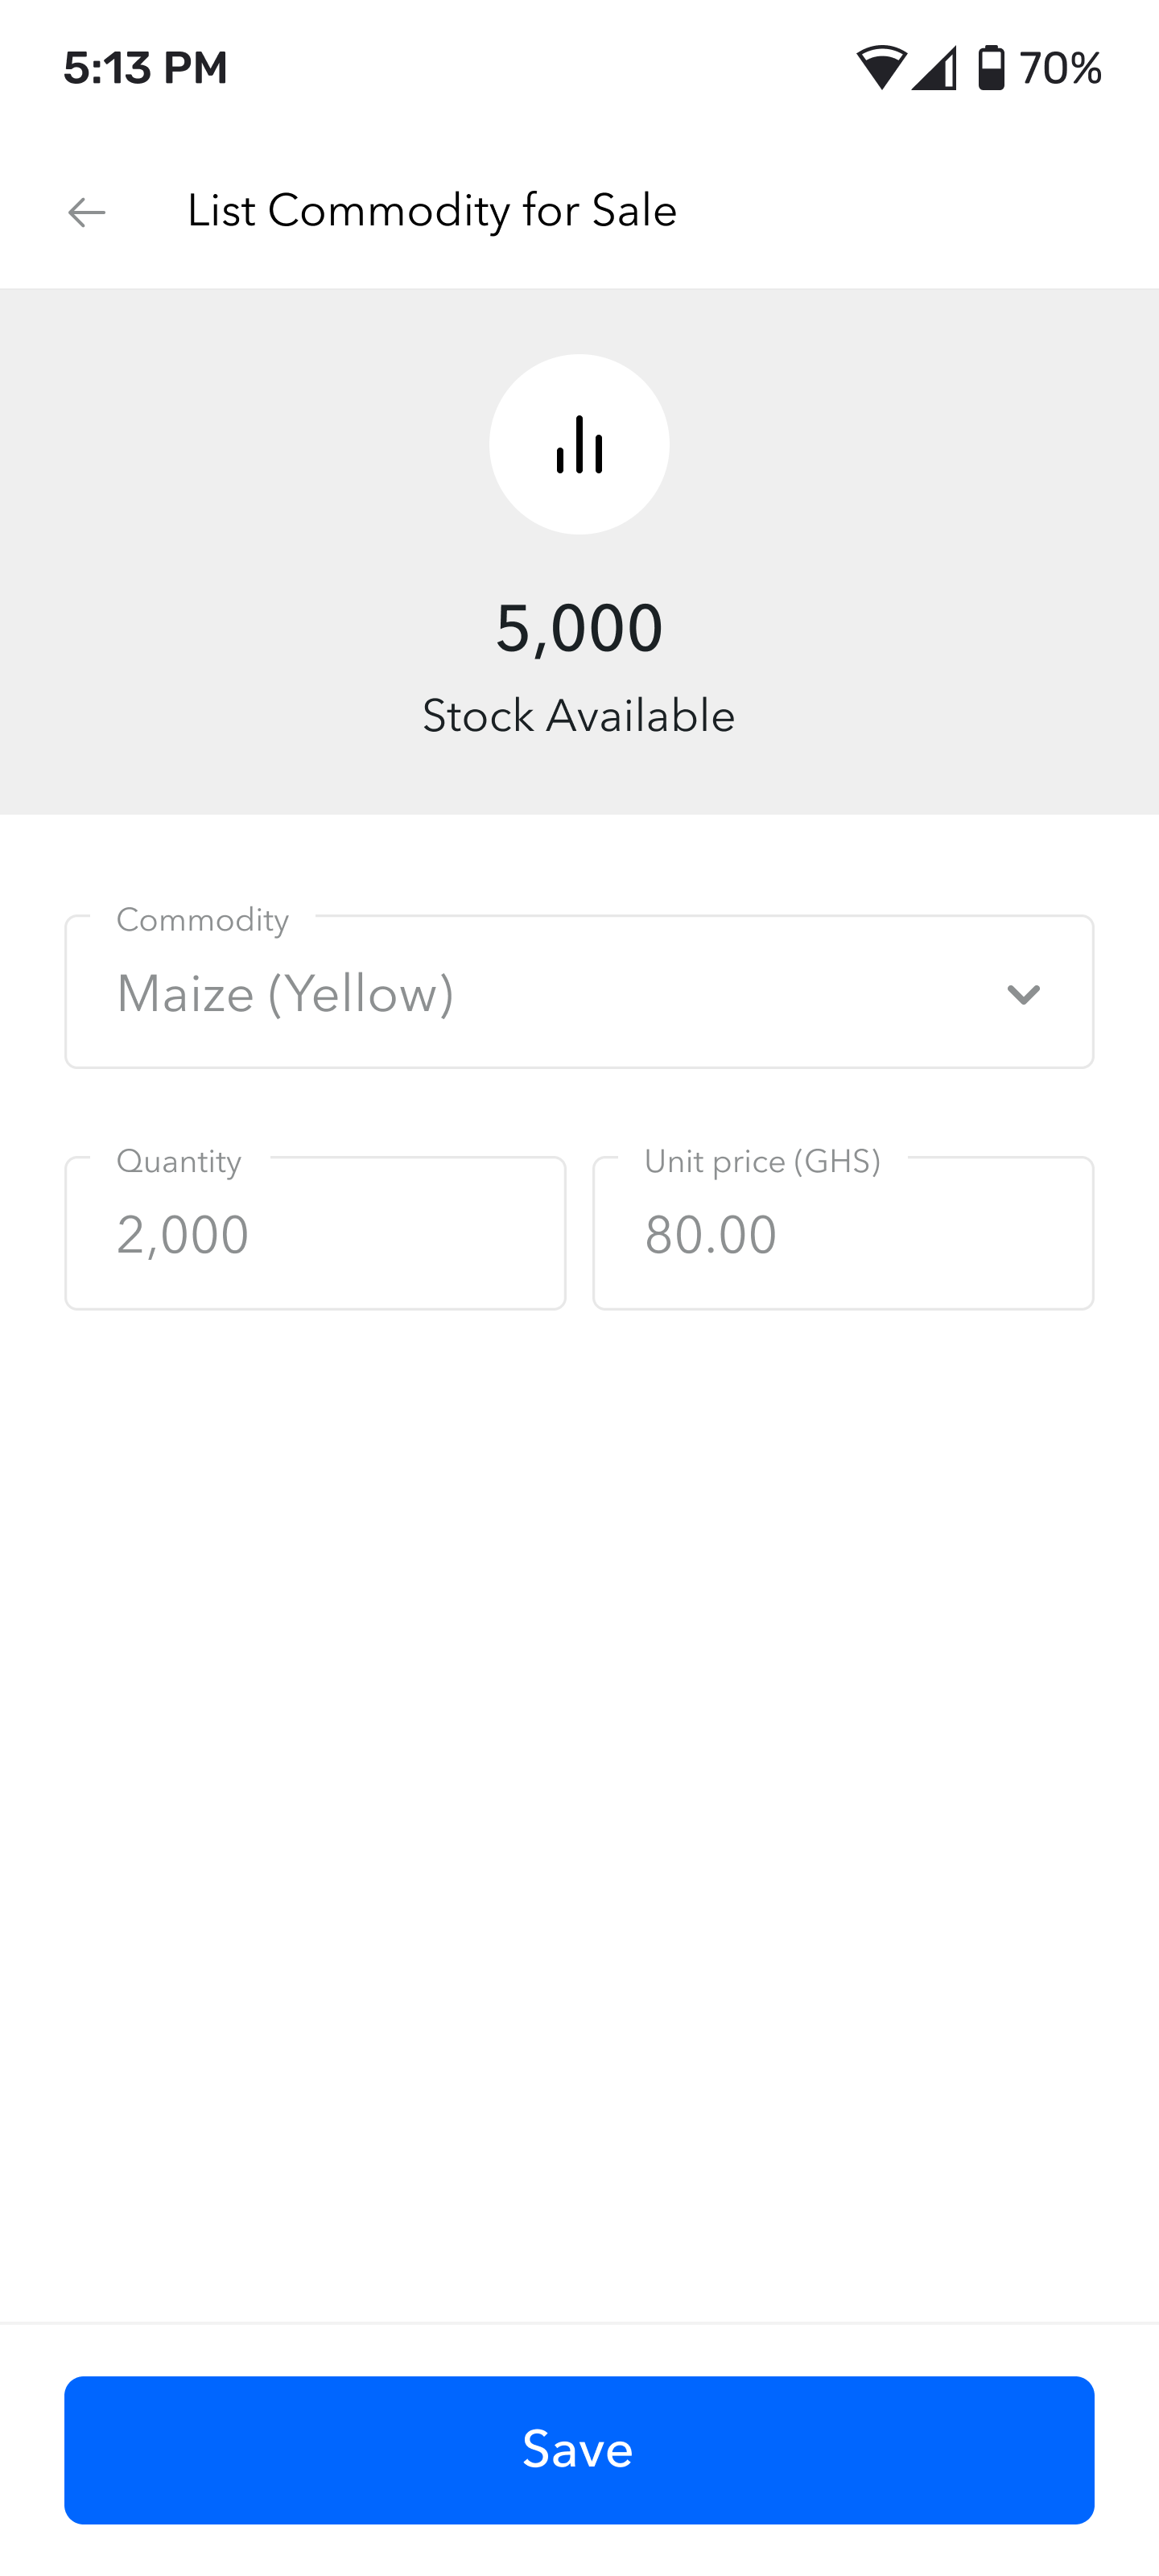 |
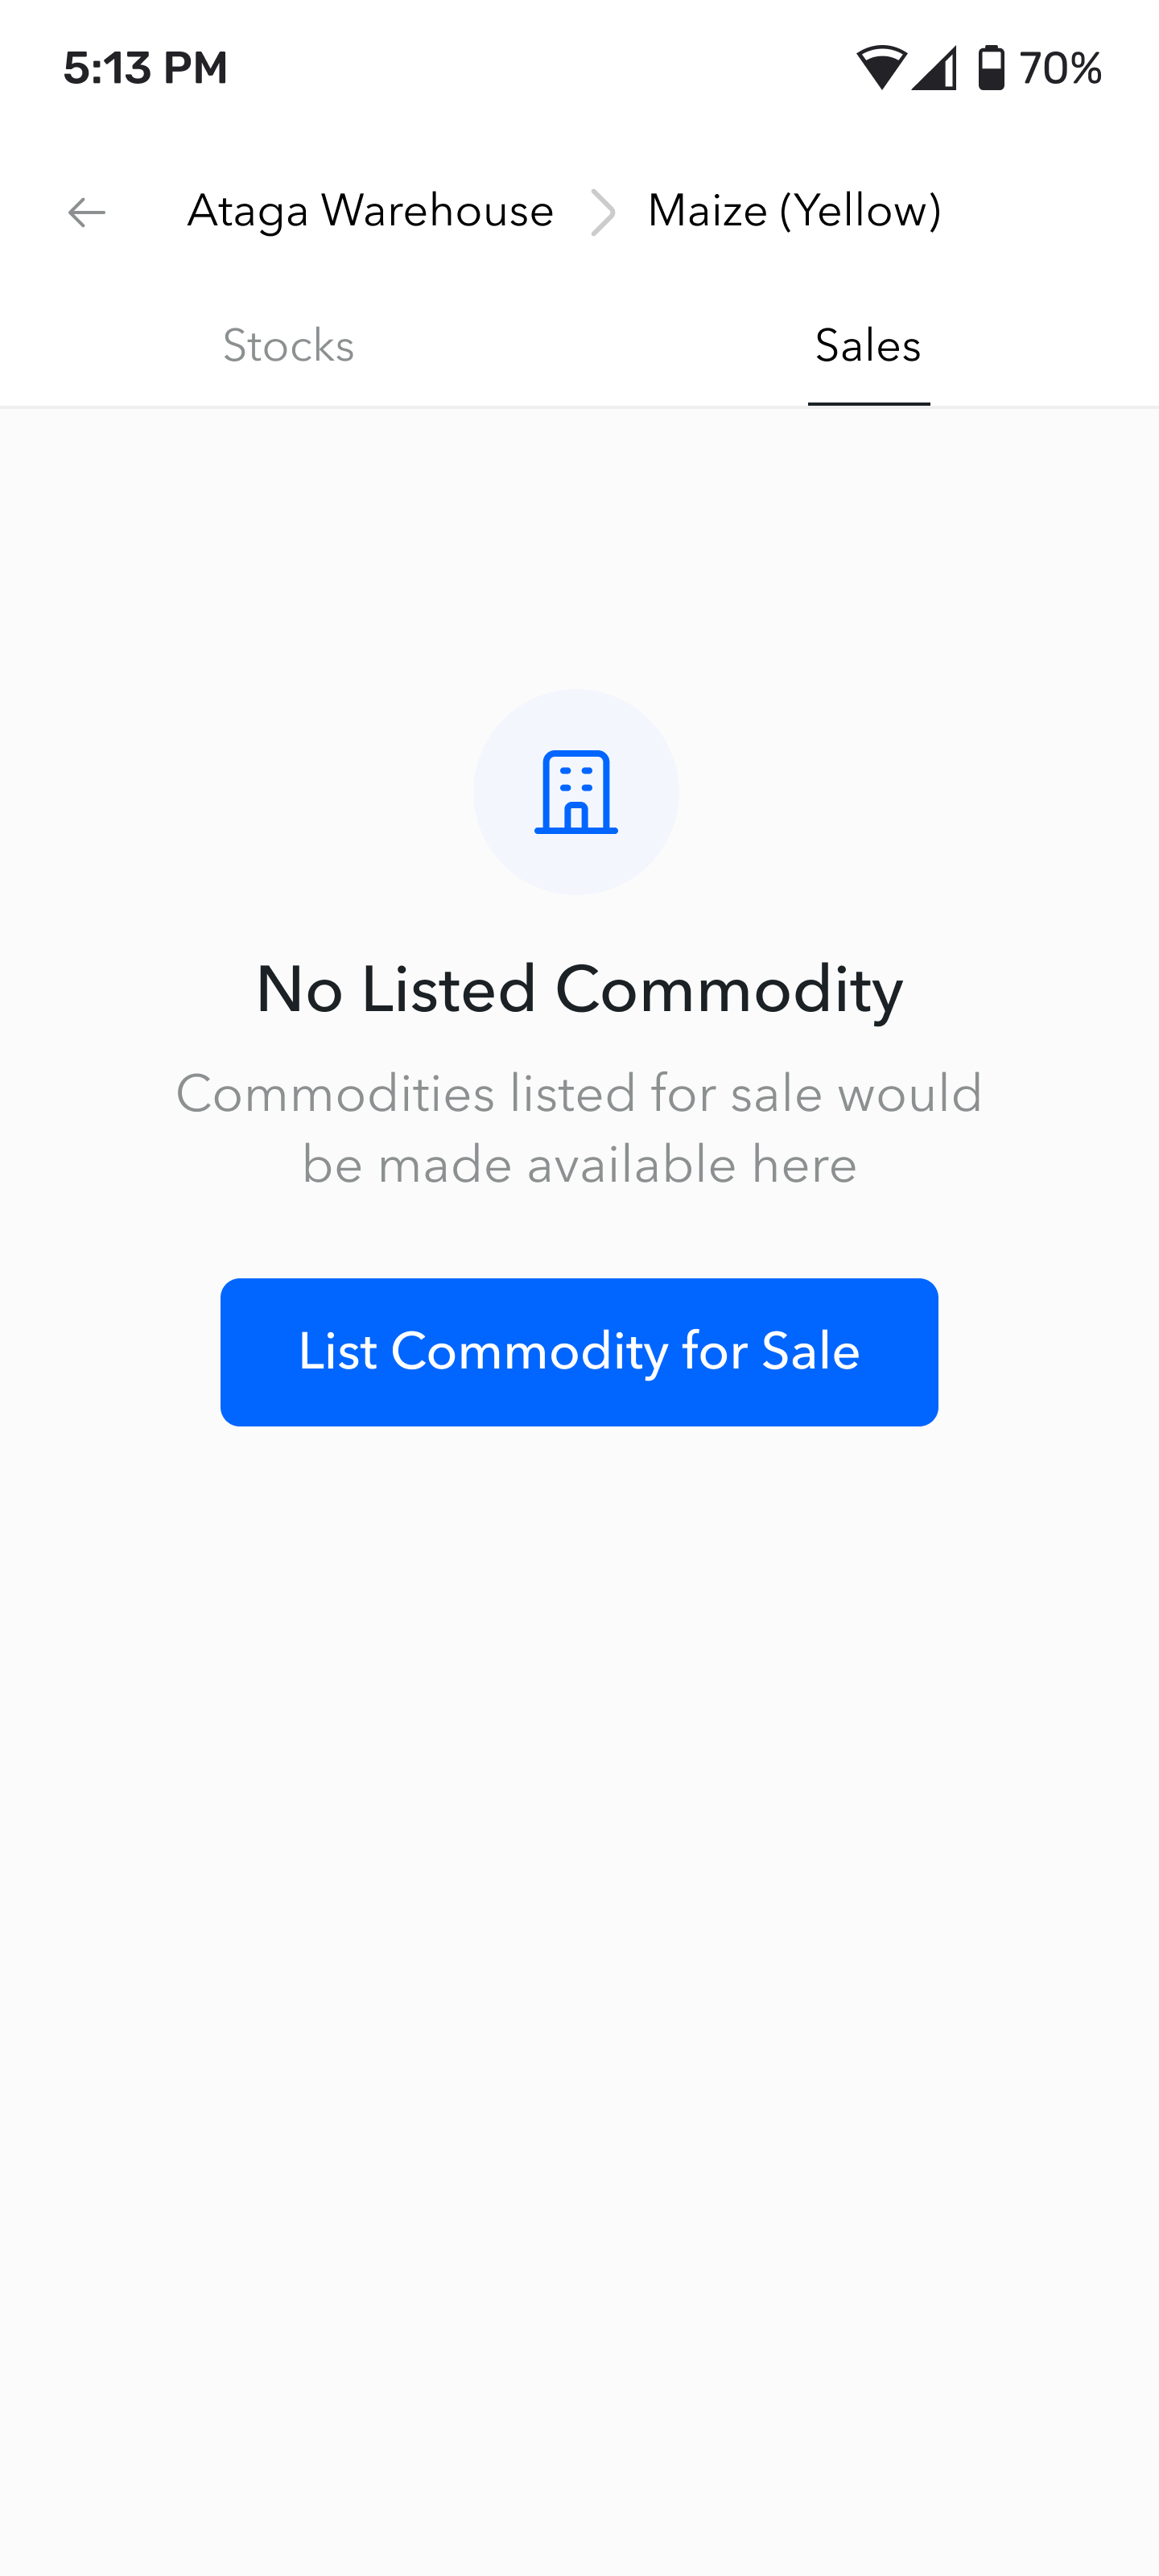
| Offers List Screen | Record Offer Screen |
| An offer can only be posted from specific stock. To post an offer, the user has to go to the Warehouse Details: With Stock Screen and click on the stock from which they want to post an offer. Next, the user has to switch to the salaes tab and then click on the List commodity for sale button. If there are offers that have already been posted, they will show up here. | To record an offer, the user has to enter the quantity they are offering up for sale. The commodity is preselected because the user can only access this screen by clicking on a commodity from the Warehouse Details: With Stock Screen. The quantity cannot exceed the total stock for this commodity. Finally the user needs to enter thow much they want to sell each unit of the selected commodity. The quantity and unit price boxes should box idsplay only the numeric keyboard. Clicking on the blue Save button will save the offer and take the user back to the Warehouse Details: With Stock Screen. A user can post as many offers until the stock level runs out. |
 |
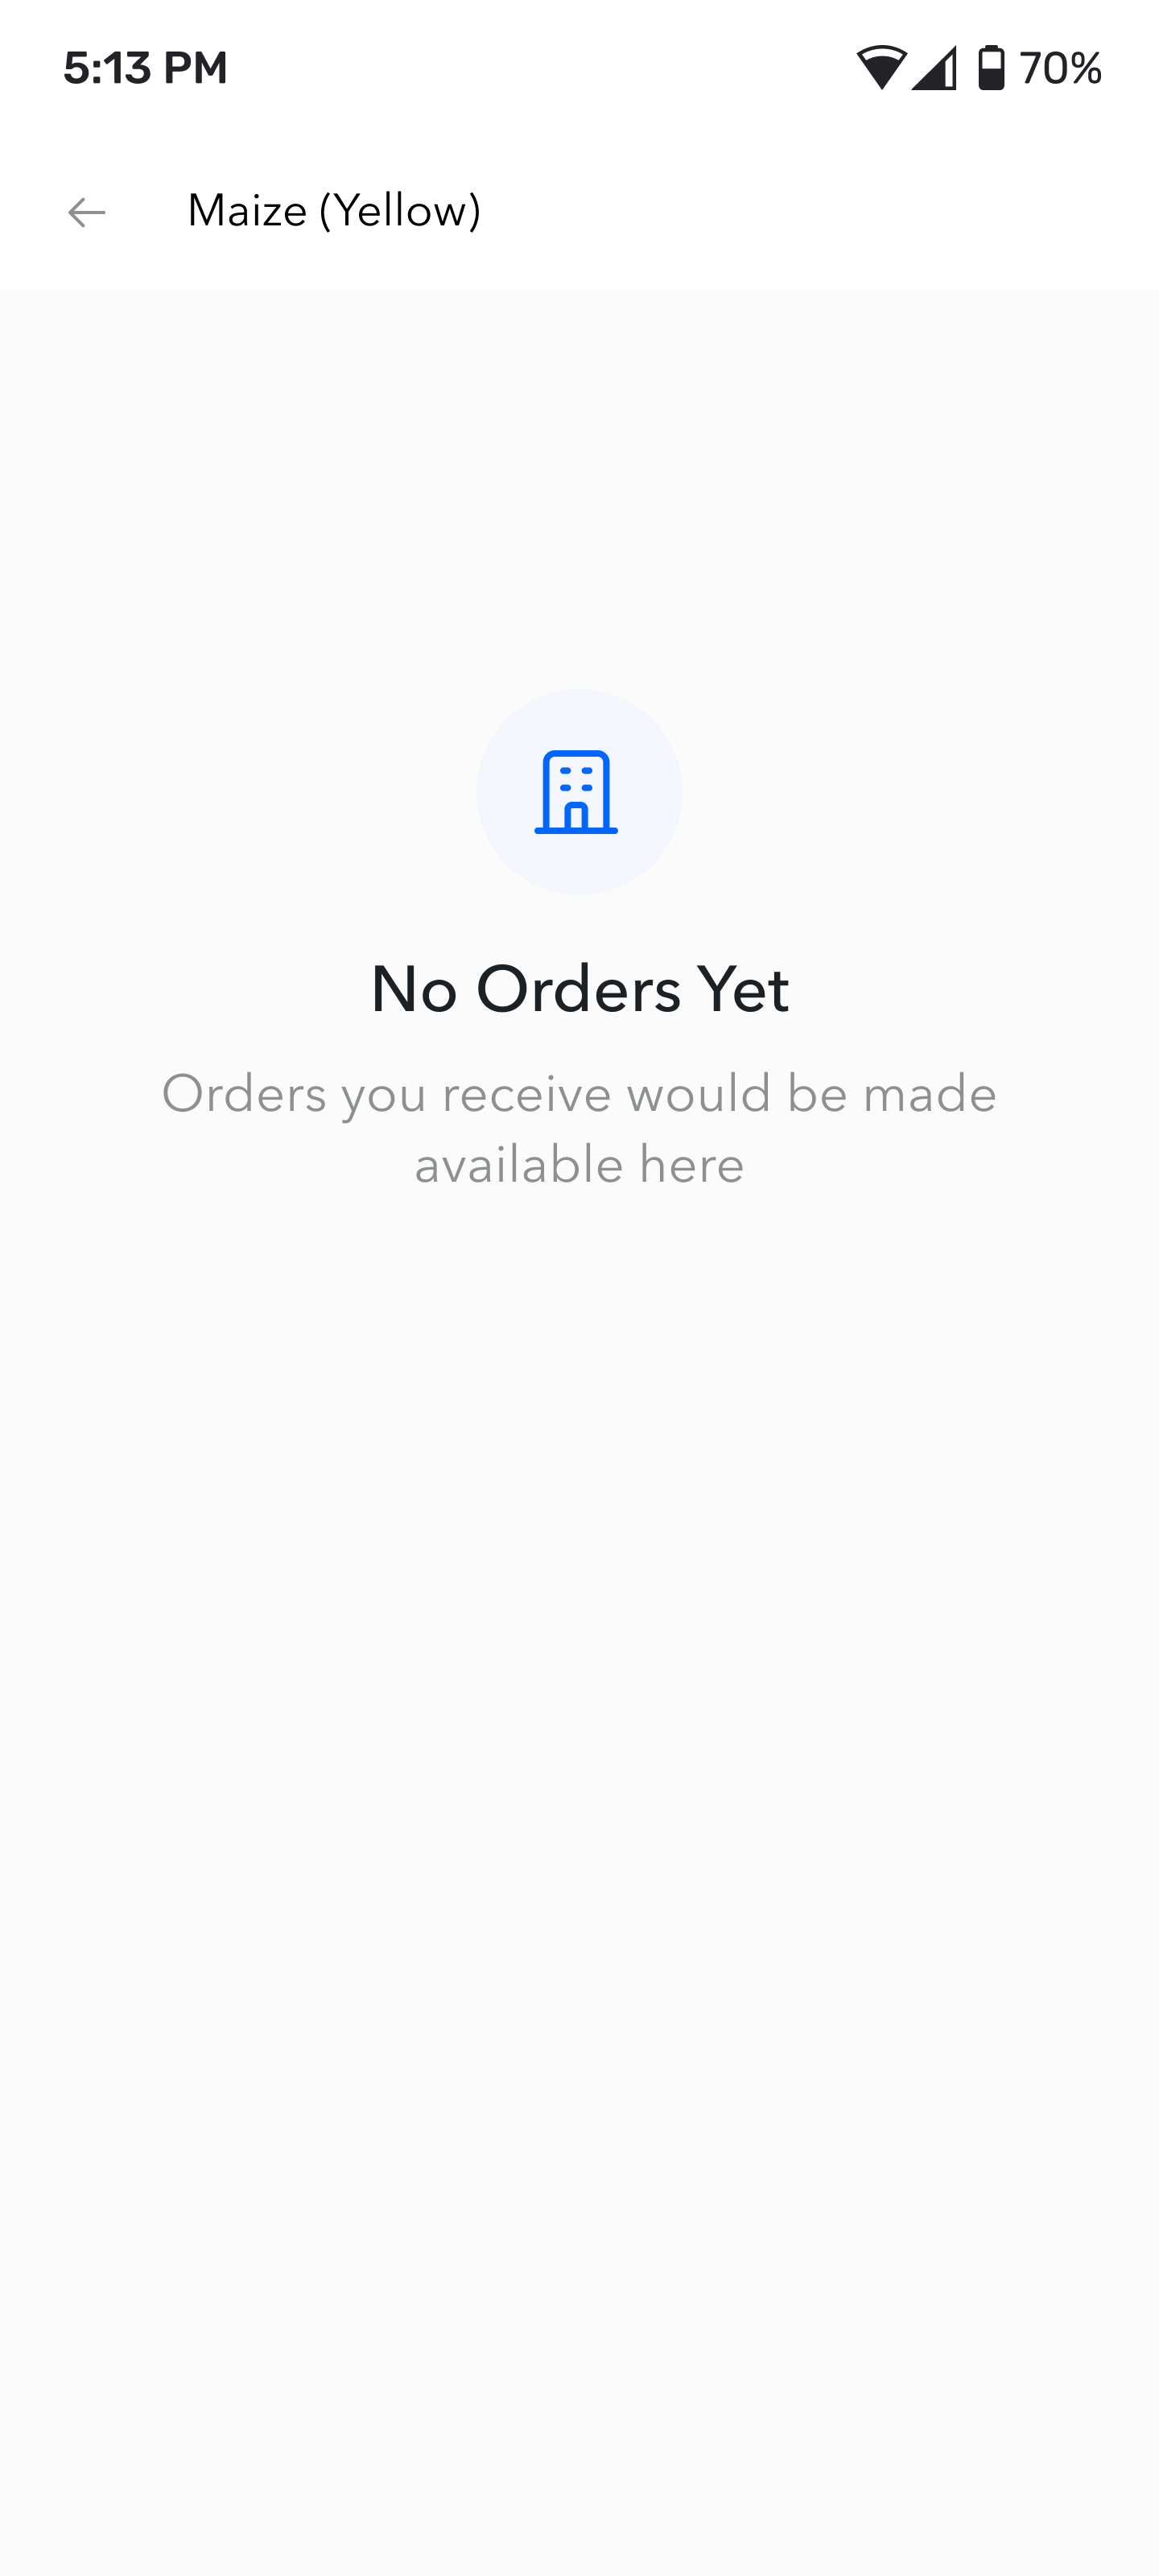 |
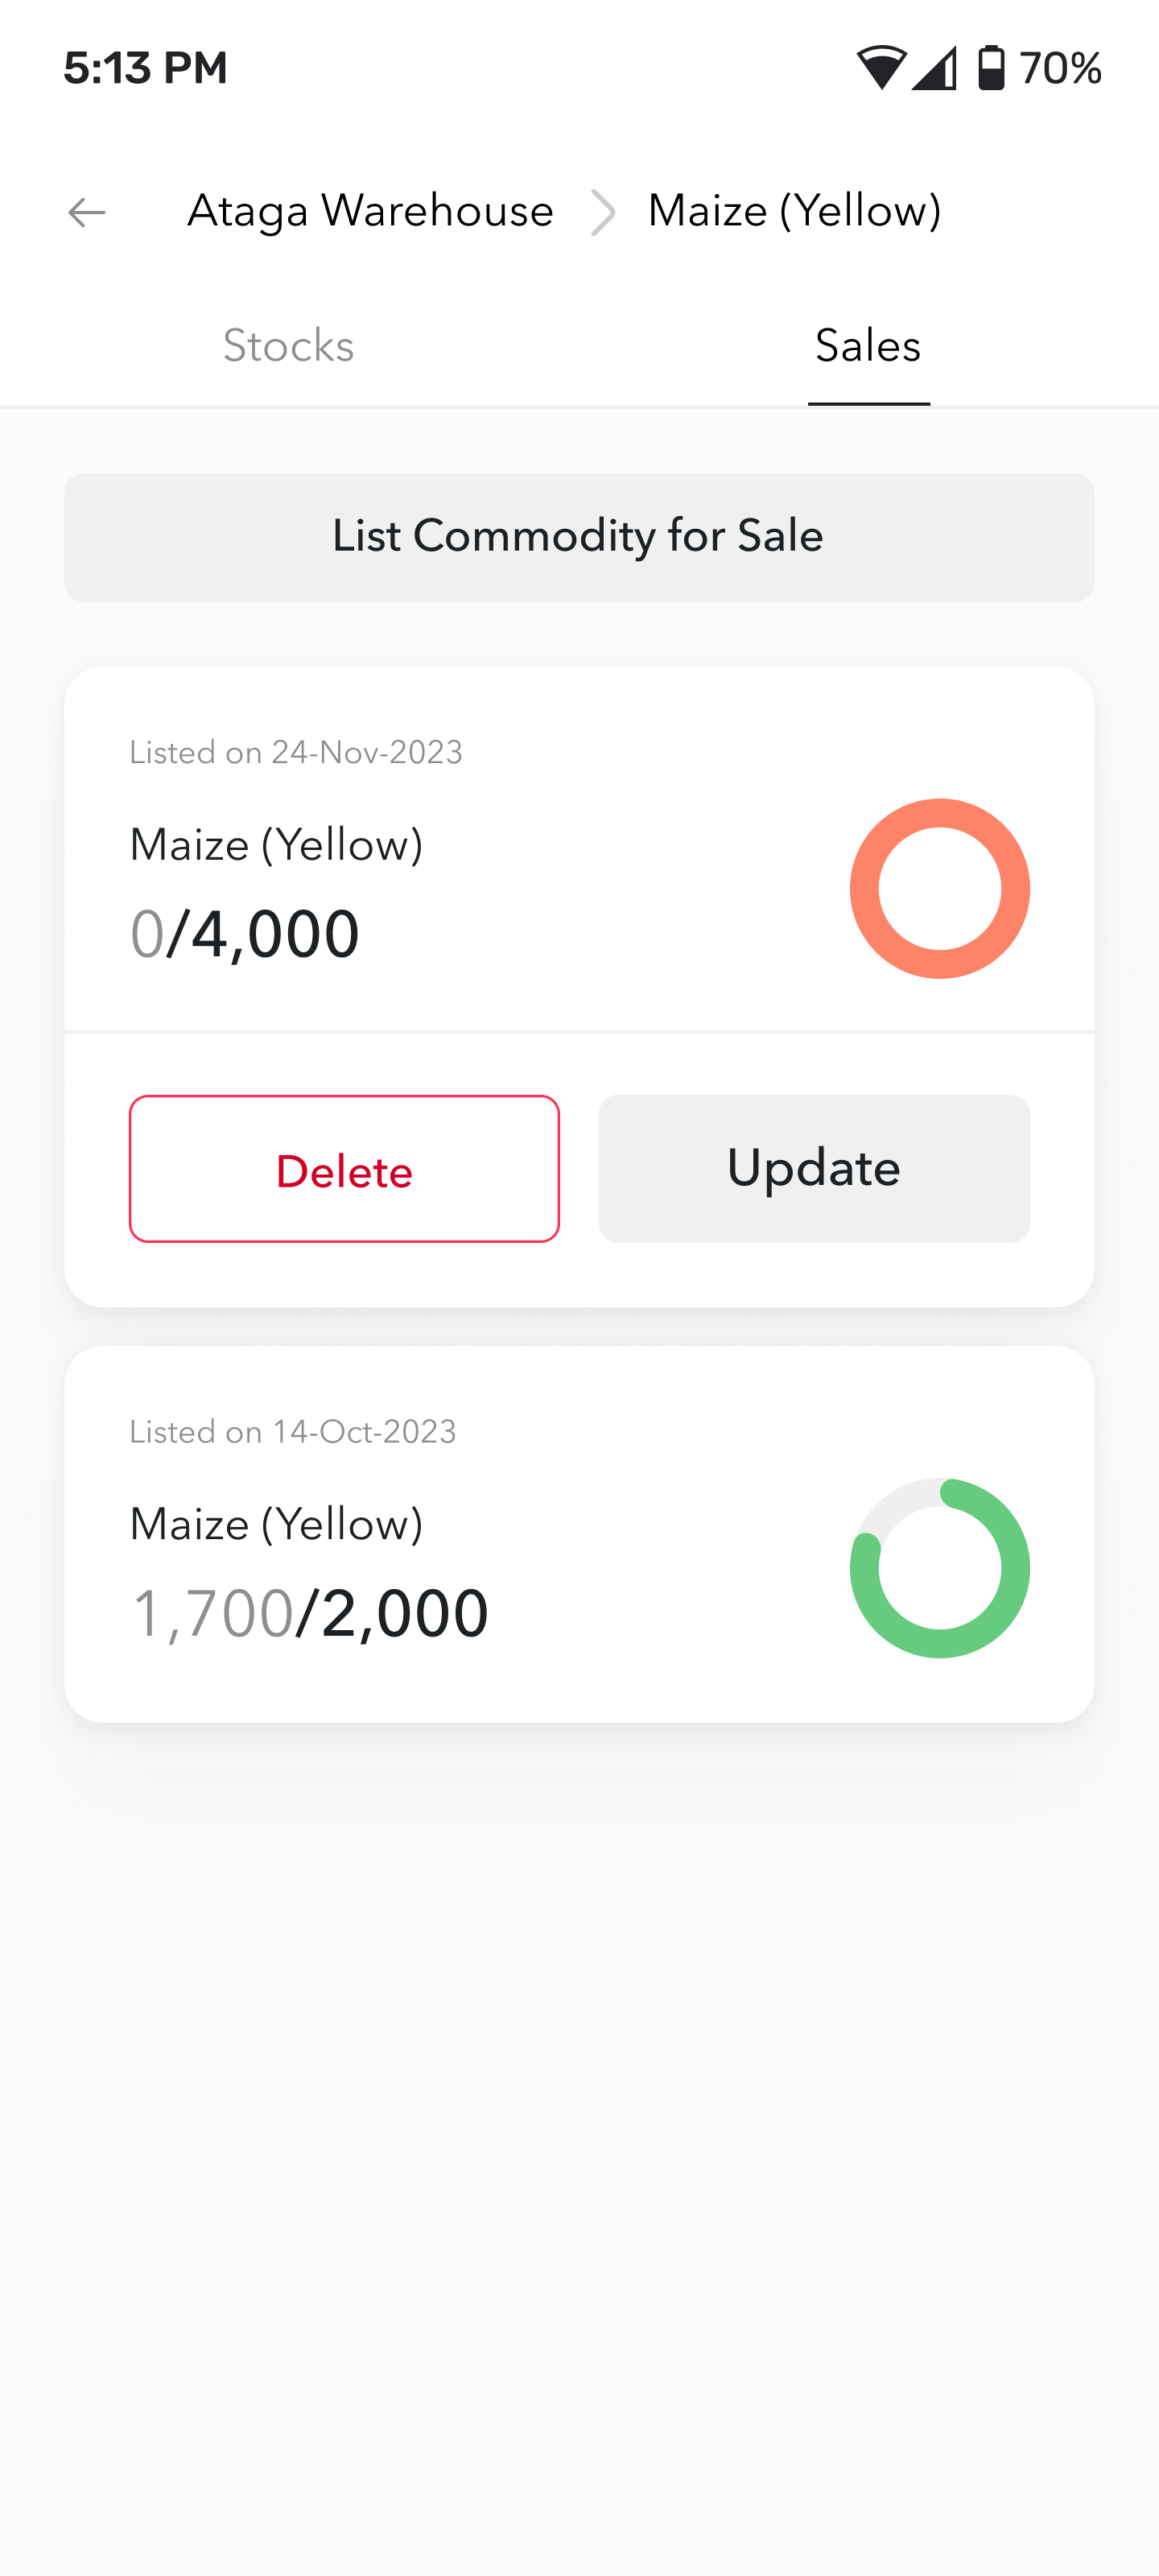
| Offers List With Offers Screen | No Orders Screen |
| The list of offers are displayed in two different ways. From the above screen, the first card shows an offer that has no expressions of interest. 0/4,000 from above means, a quantity of 4,000 was posted up for offer but there has been 0 interest from buyers. In this case the user can Update or Delete the offer. Only the quantity and unit price can be updated. The second card shows 1,700/2,000. This means there has either been one or multiple expressions of interest to buy 1,700 of the 2,000 that was posted up for sale. This card has no update and delete buttons. Clicking on a card that has no expressions of interest, will display the No Orders Screen. | The No Orders Screen is an empty screen that simply informs the user there are no orders yet for the offer they clicked on. If there are orders available, the Orders List Screen will be displayed instead. |
 |
 |
| Stock List Screen | Pending Orders Screen |
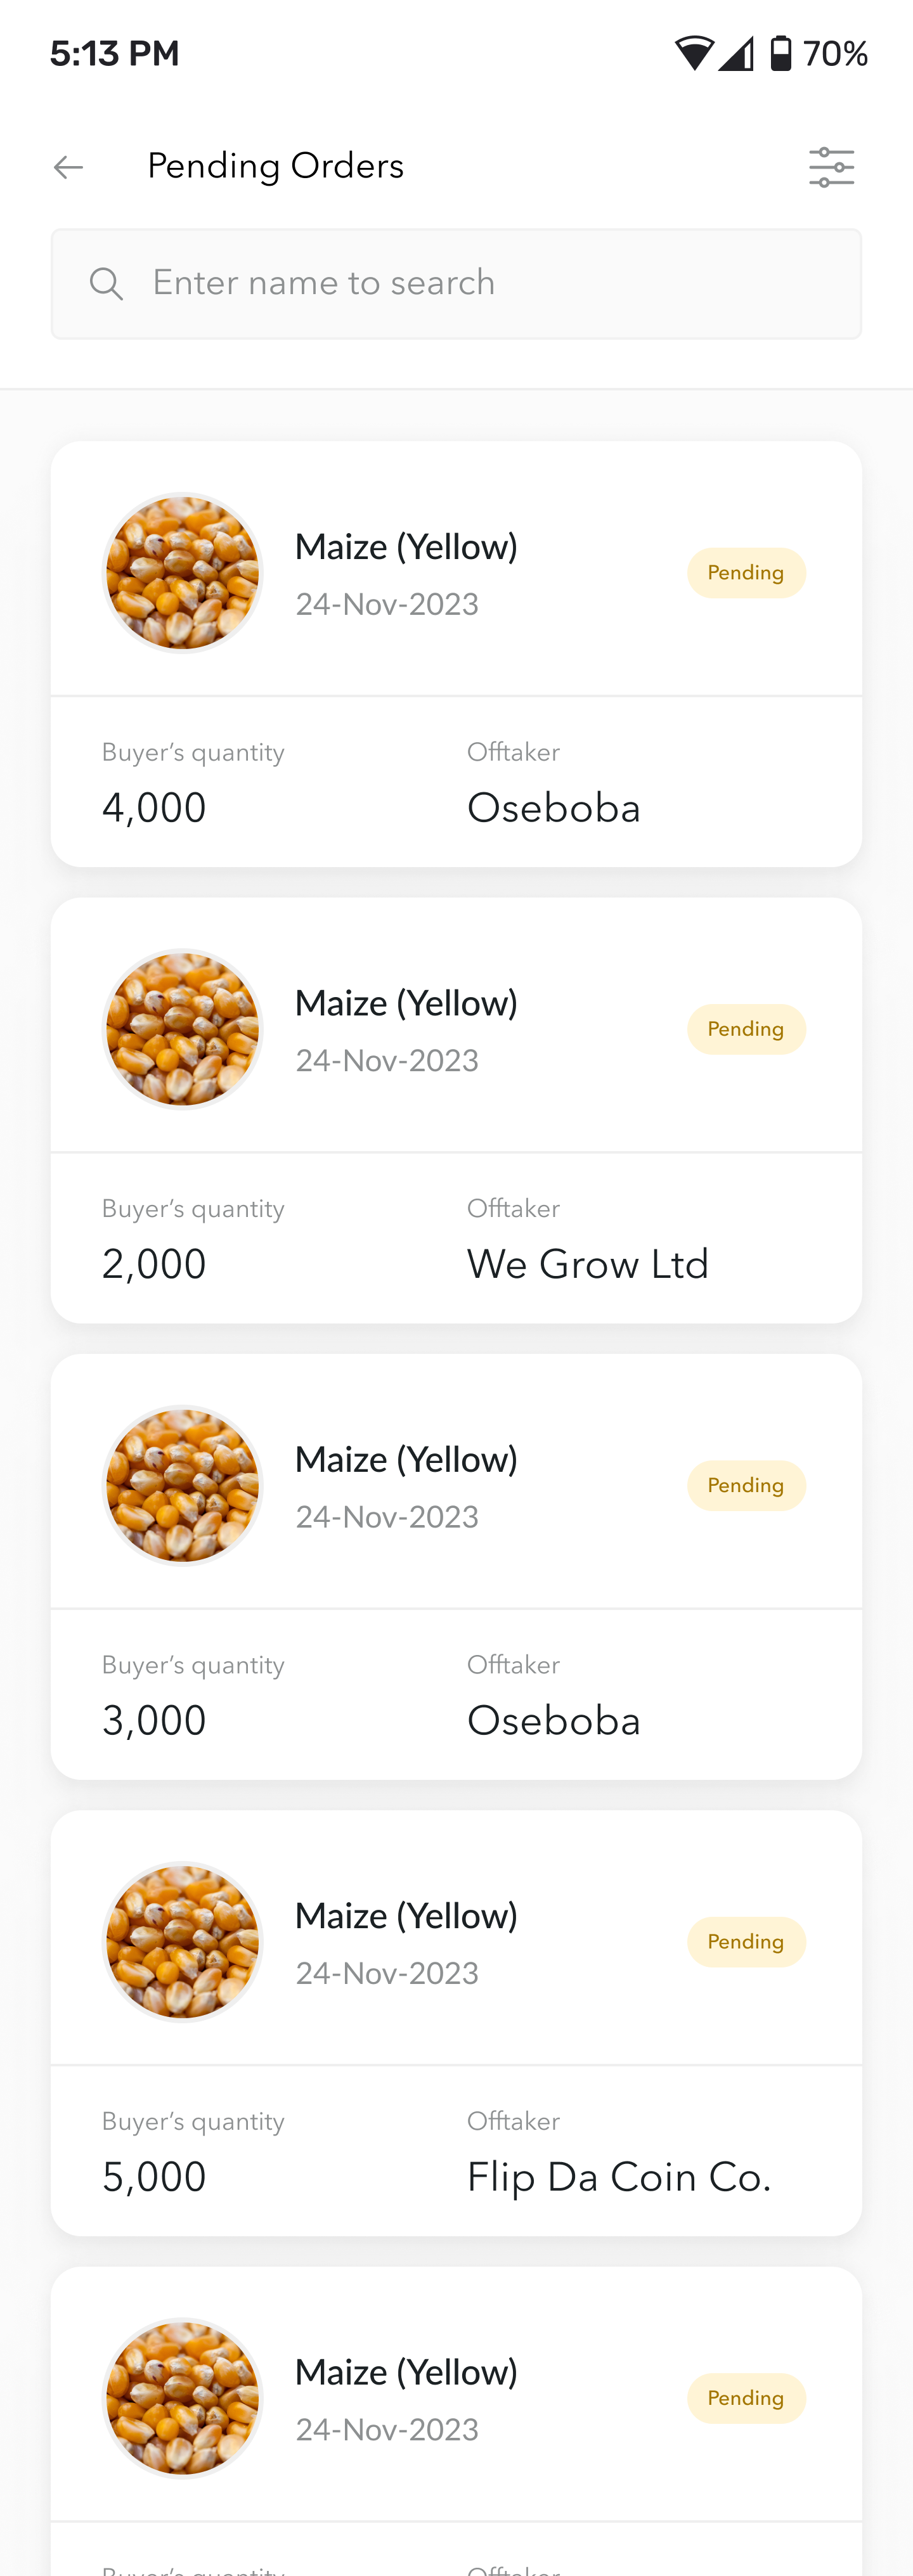
| There is a shortcut on the Stock List Screen that leads to the list of orders. At the bottom of the screen is one pending order with a link to See all other orders. Clicking on this link will send the user to the Pending Orders Screen. | The list of pending orders show the commodity, name of the buyer, date the order was placed and the quantity the buyer is interested to buy. The buyer inputs this quantity when they are expressing interest. |
|
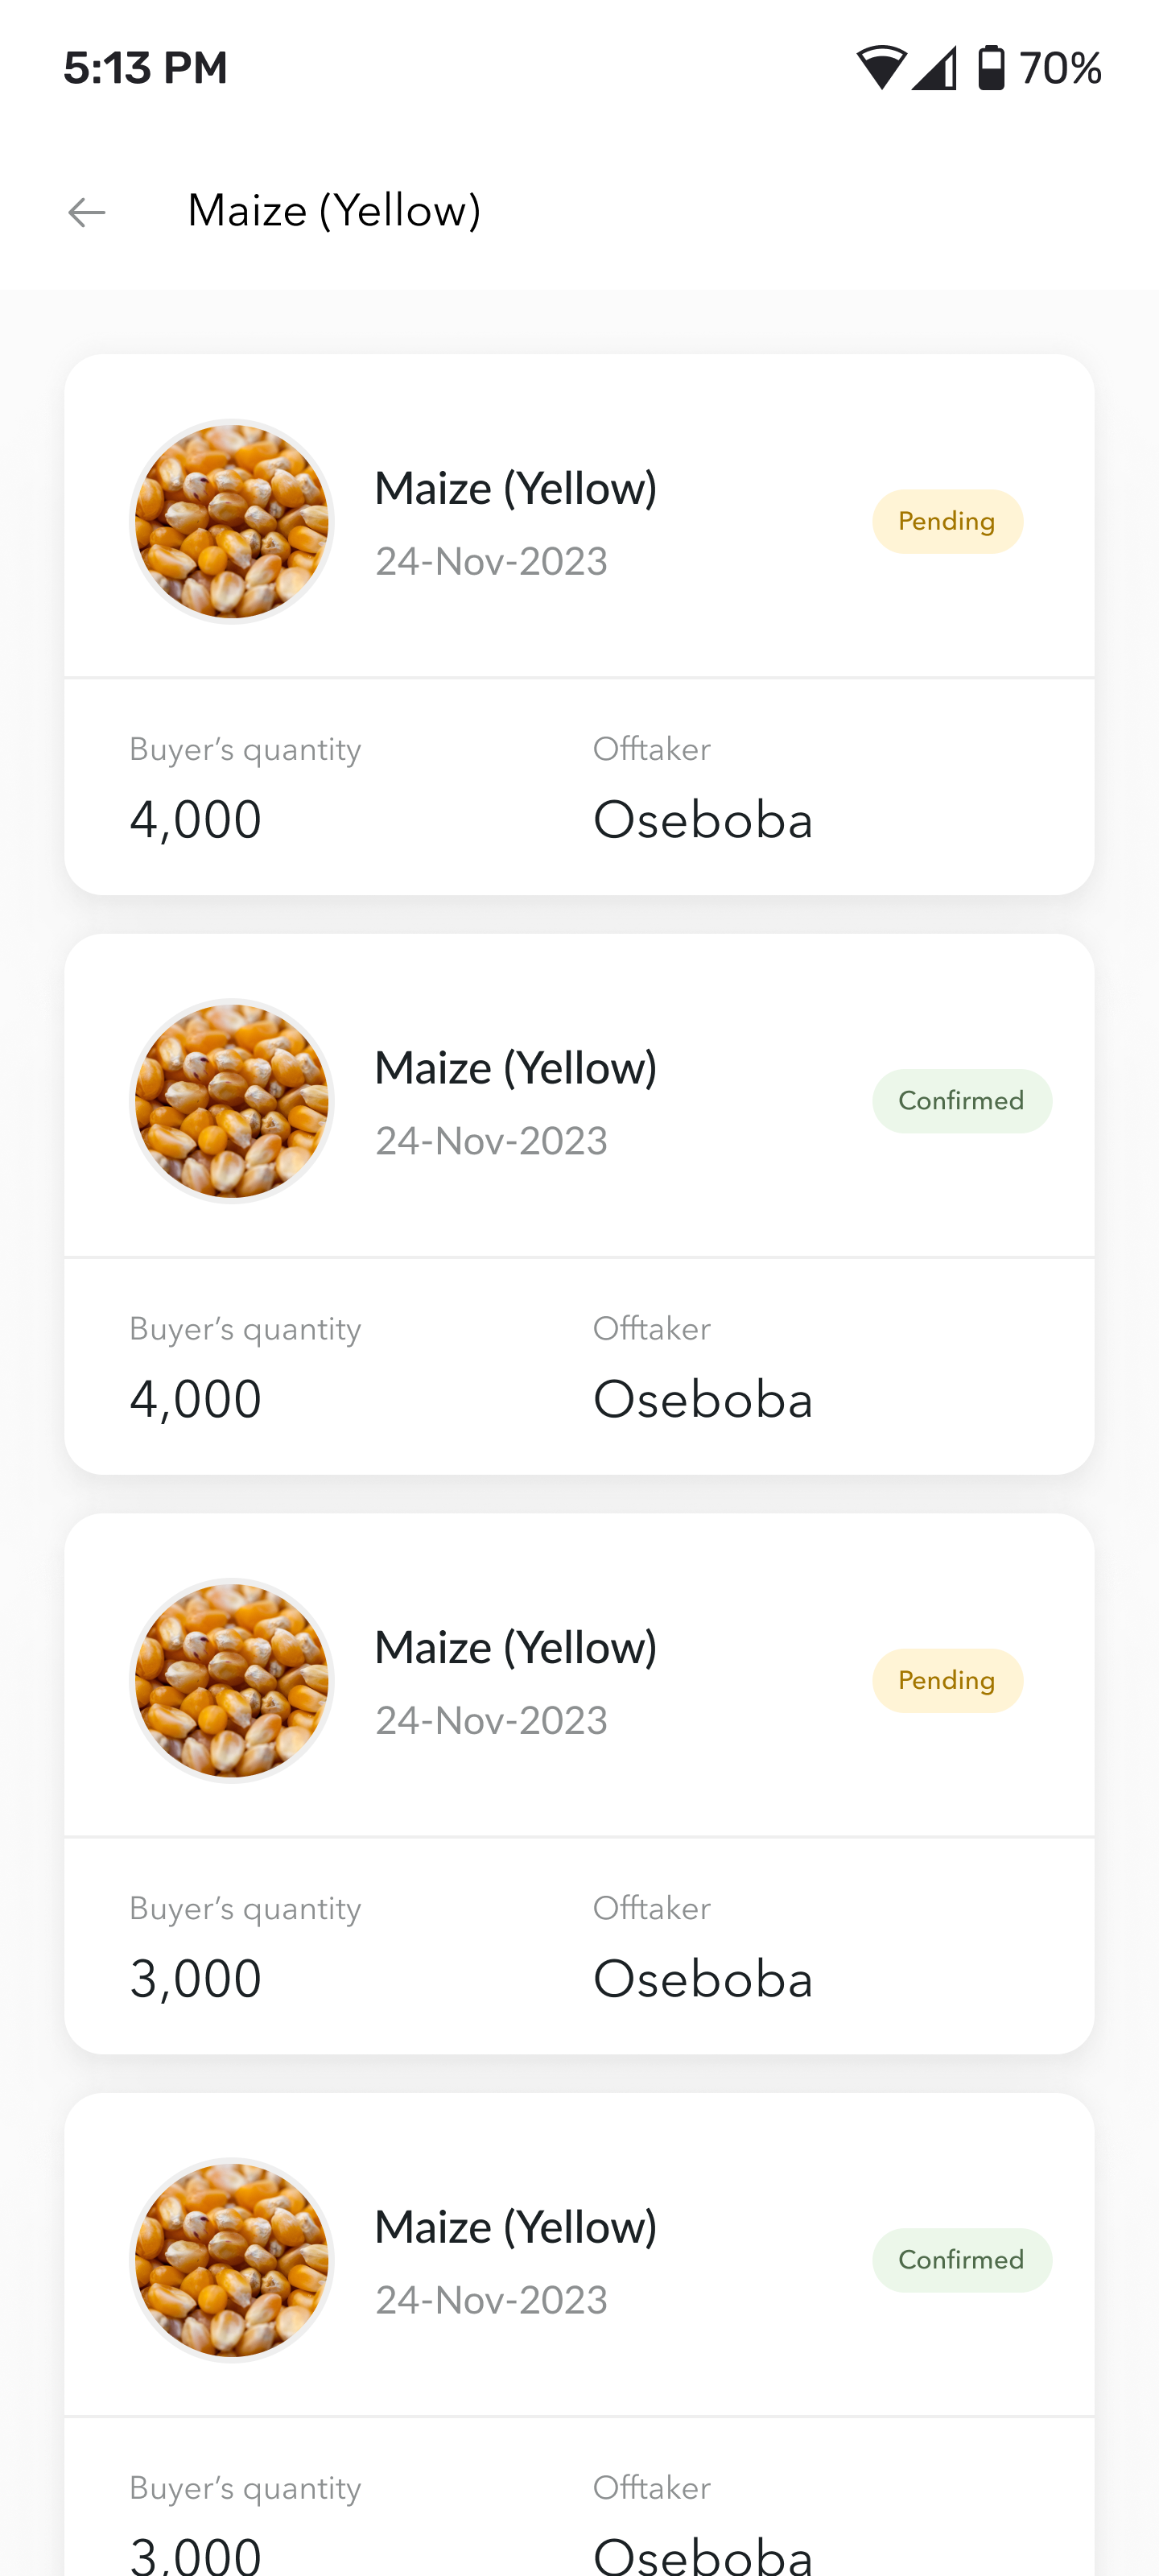 |
| Offers List With Offers Screen | Orders List Screen |
| As explained earlier, the second card on the Offers List With Offers Screen with the green circle, indicates there are experessions of interest for that commodity. The user can click on this card to see the list of all orders (Orders List Screen) for that particular stock. The green circle will become a full circle if the quantities in the confirmed orders match what was offered for sale. | The Orders List Screen displays a list of all expressions of interest that buyers have submitted. Again, the list of commodities is limited to what commodity was clicked on from the Offers List With Offers Screen. Each order card displays the commodity ordered, the date the order was placed, the quantity the buyer expressed interest to buy. This quantity could be less than what was posted on offer. The card also has the name of the buyer. There is an indication of whether the order has been confirmed or not. Multiple users can express interest to buy the same offer. The cooperative will need to confirm which orders they want to fulfil. This is completely their call. |
 |
 |
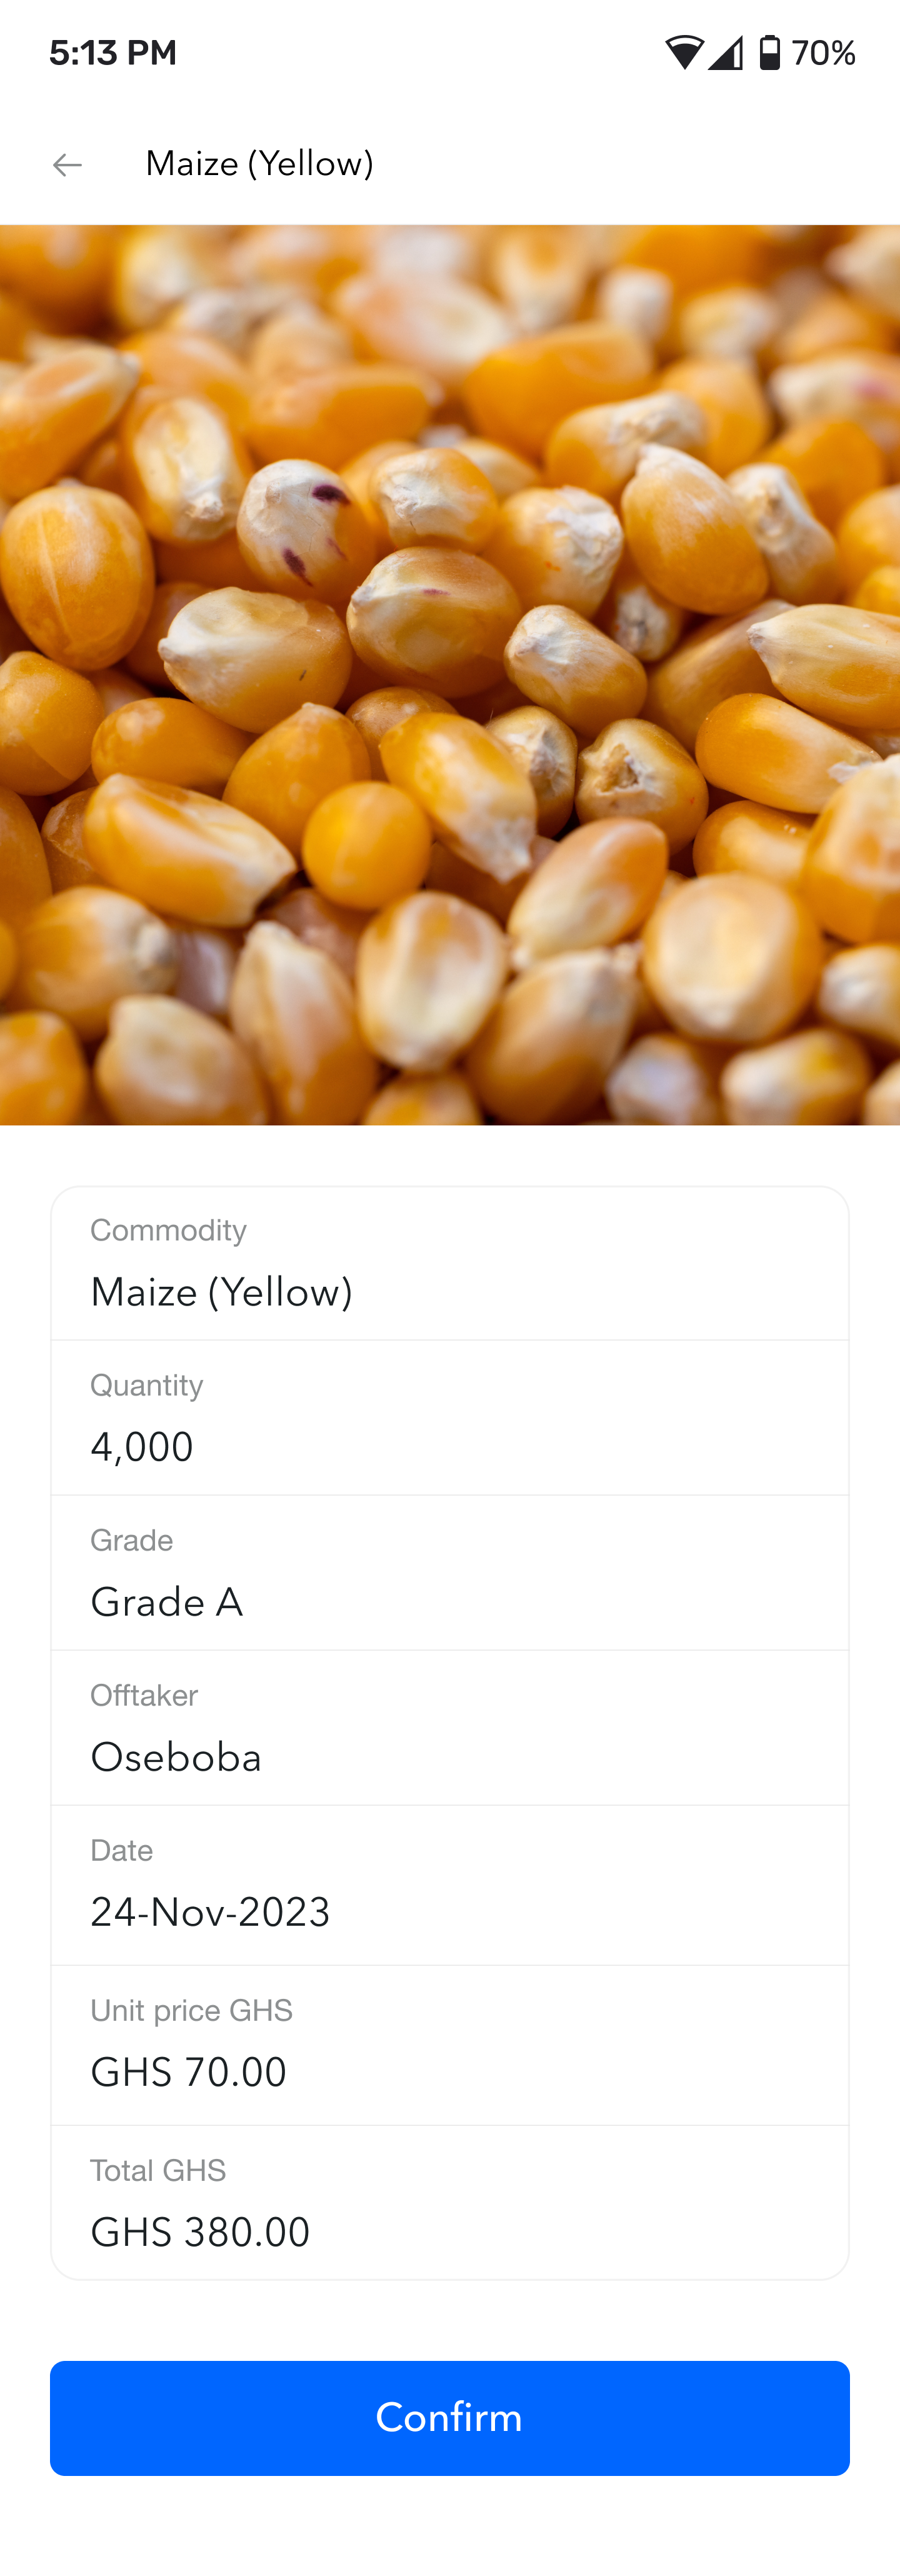
| Offer Details Screen | Confirm Order Screen |
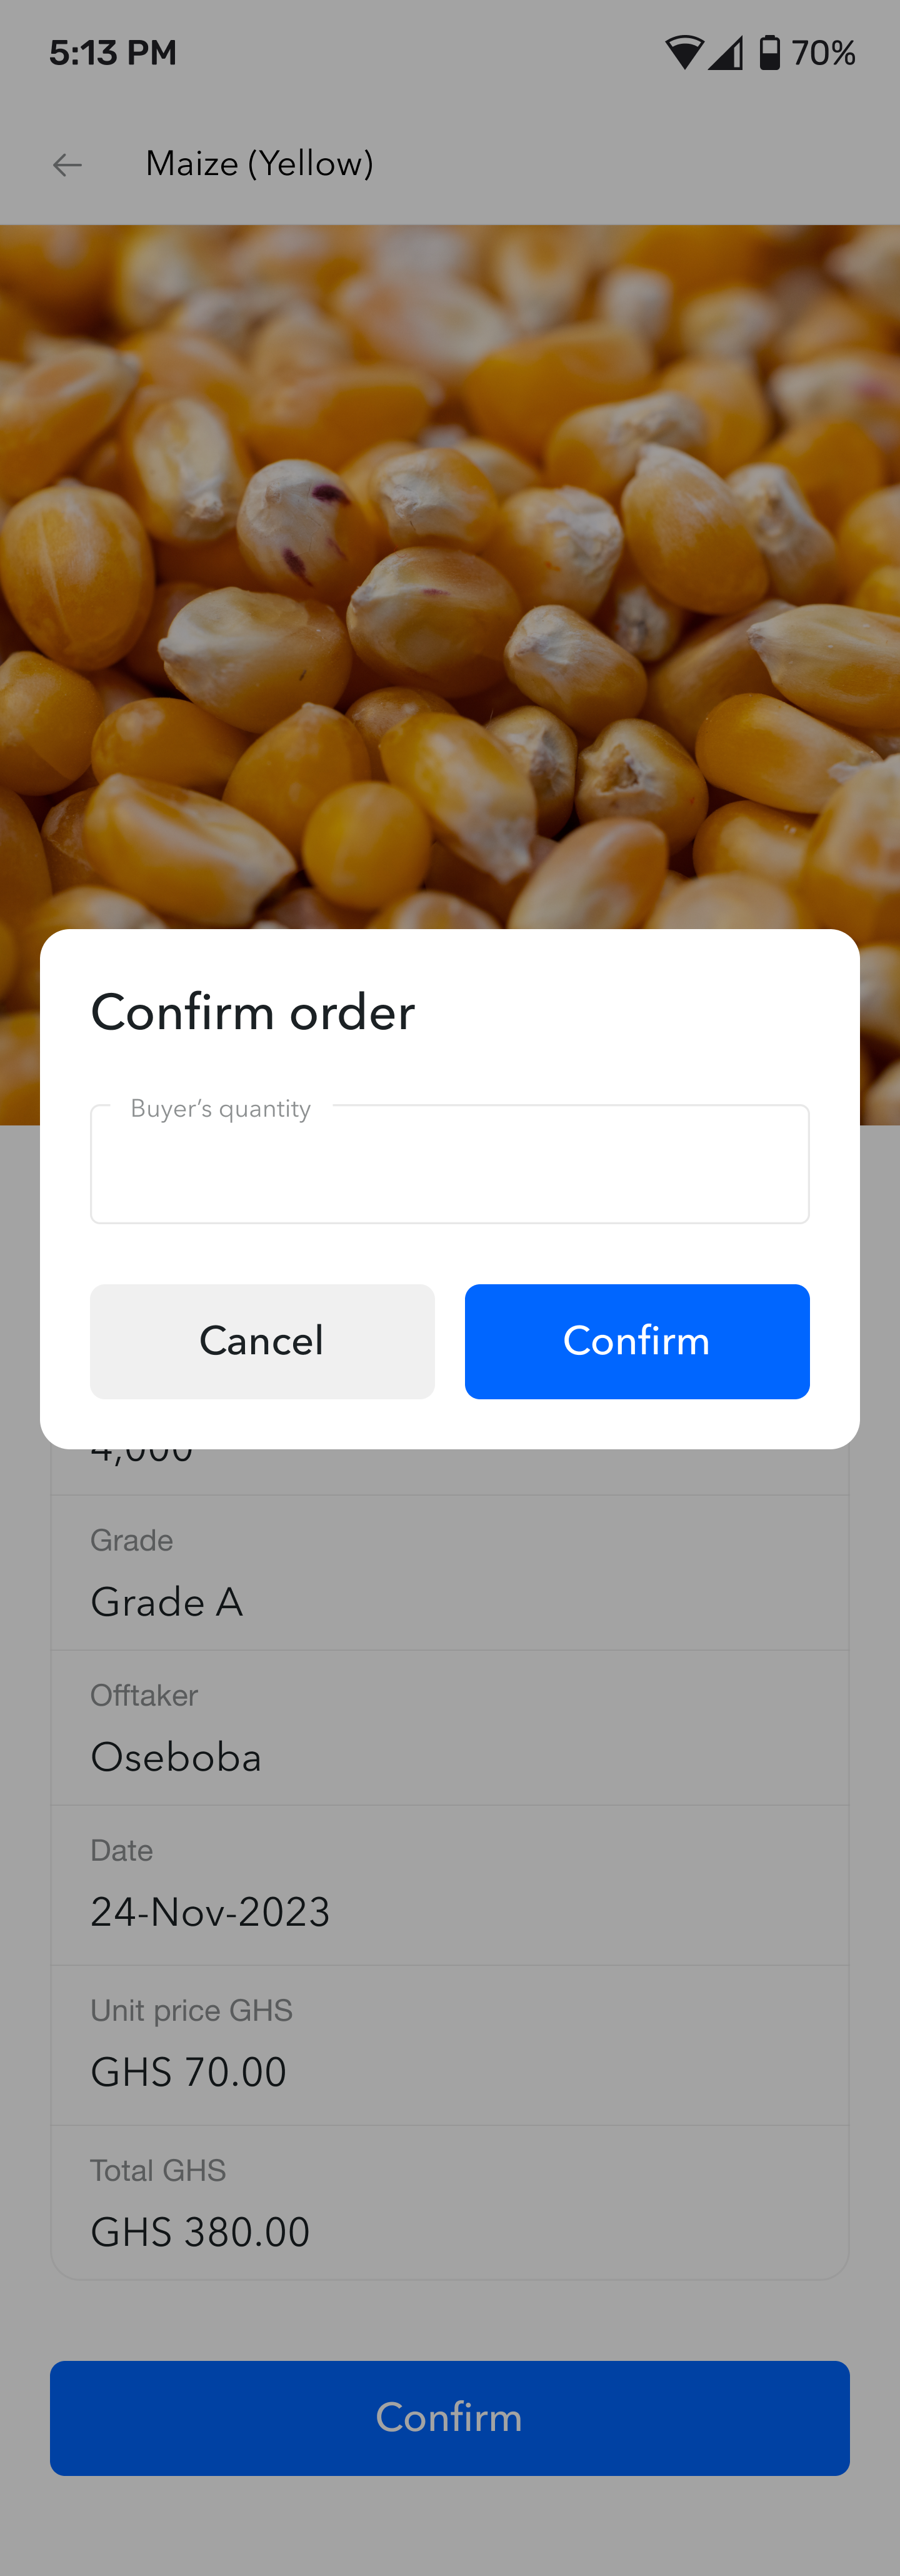
| Clicking on an order from the Orders List Screen will display the details of the order with the option to confirm the order by clicking on the blue "Confirm Order" button. If the order is already confirmed, there will be no blue button to confirm the order. Confirming an order is usually done after the buyer has inspected and paid for the commodities available in the order. Confirming an order will reduce the stock level of that commodity in the warehouse. | Clicking on the *Confirm" button from the Offer Details Screen displays this screen where the user can confirm the order by entering the Buyer's quantity. By default this field will be prefilled with the quantity the buyer put when they expressed interest. The cooperative can update this quantity in case the buyer bought more after making the inspection. After confirming an order the user should be sent back to the list of orders. |
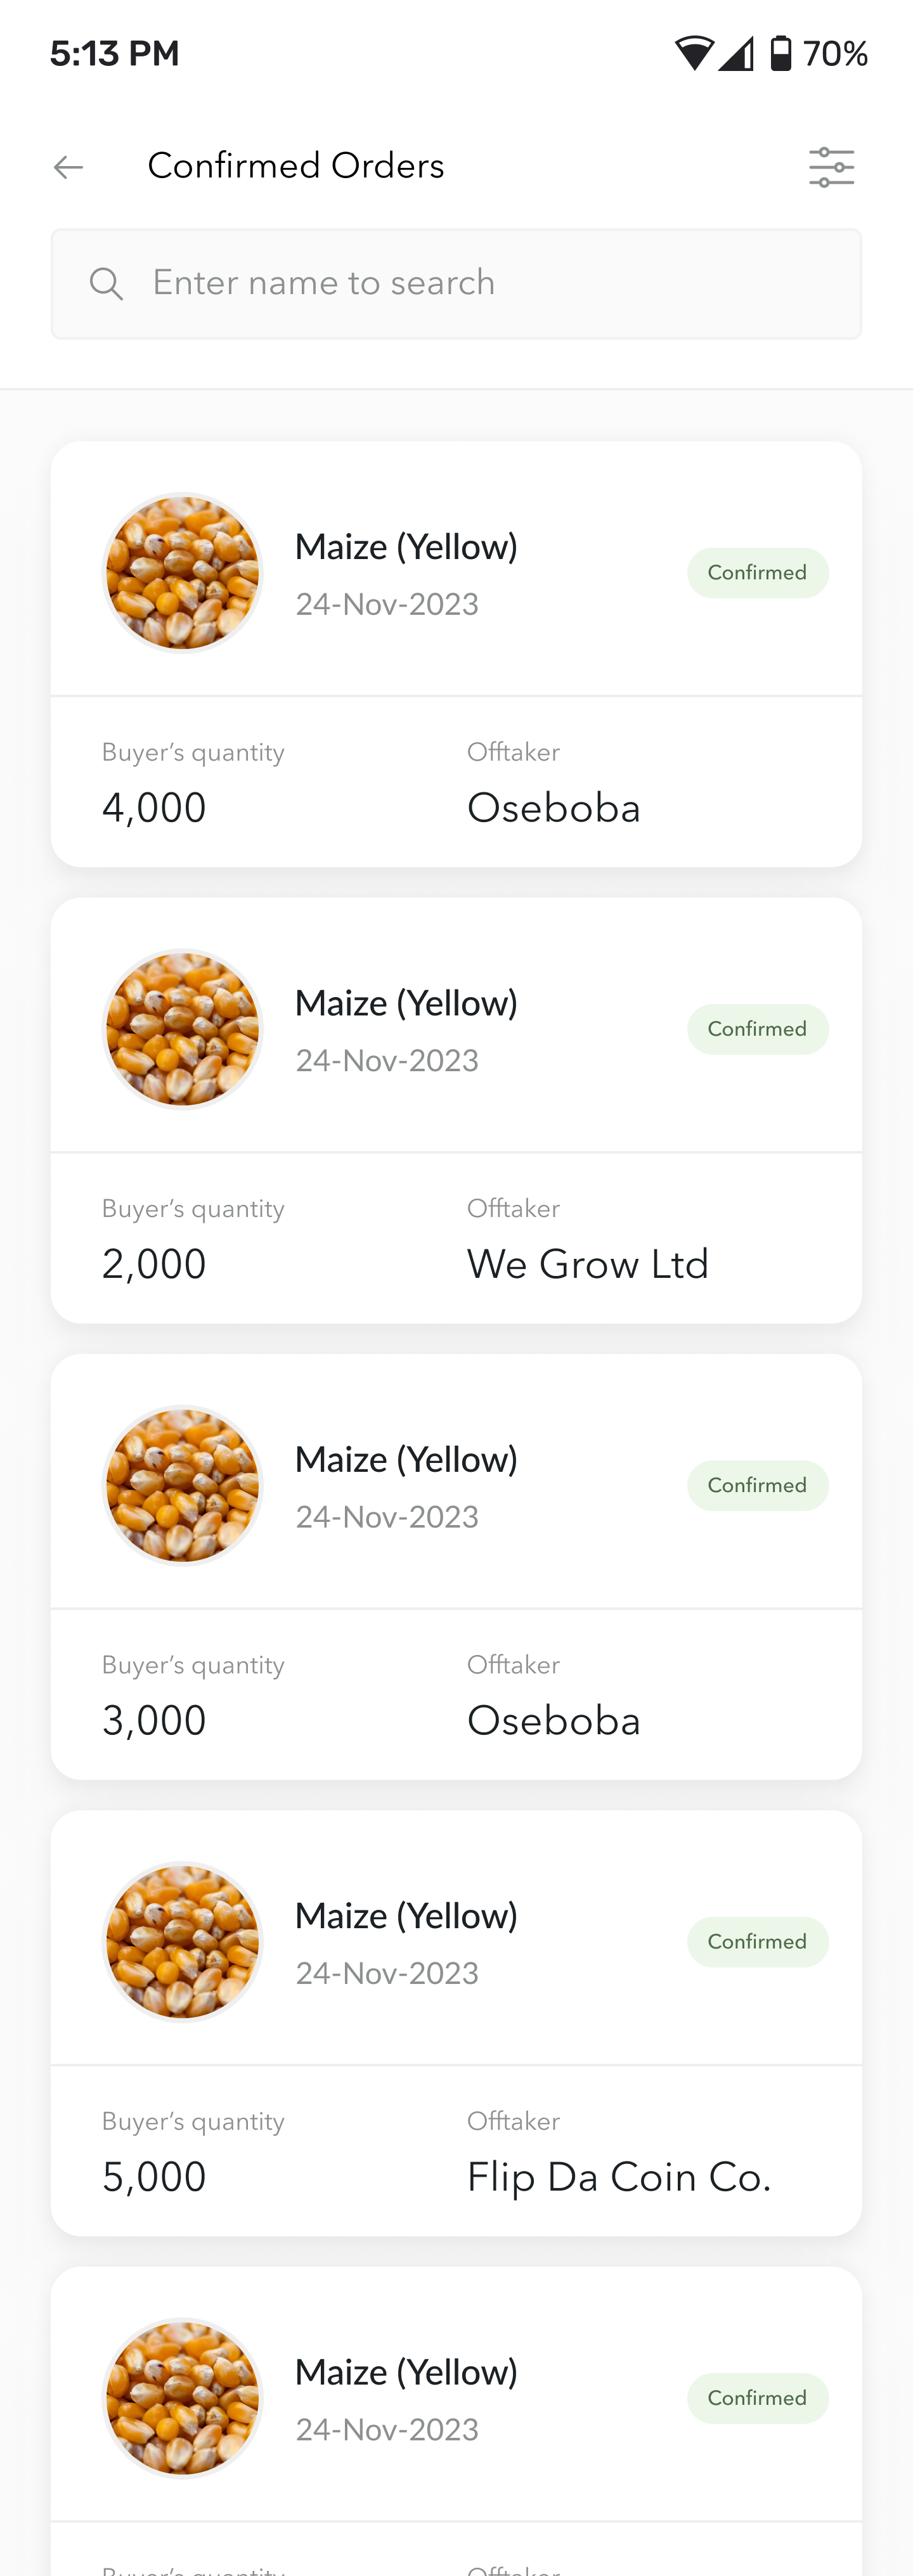 |
Clicking on the Total Sales* card from the Stock List Screen wkll display the Confirmed Orders Screen. |
| Confirmed Orders Screen |
In This Document